This digital library houses the book on Oncology and Orthopedic Oncosurgery.

It includes academic lectures, presentations from national and international congresses, published papers, case discussions, performed surgical procedures, and proprietary techniques developed.

The digital format was chosen because the web allows the inclusion of texts with numerous visual resources, such as images and videos, which would not be possible in a printed book.

The content is intended for students, healthcare professionals, and the general public interested in the field.

Total Humerus Prosthesis Technique in Osteosarcoma

80e4e458131f4edc49cacad3ec586437 3
Total Humerus Prosthesis Technique in Osteosarcoma. A 57-year-old male patient reported the appearance of low back pain at the end of October 2014, radiating to the MIE. Due to the progression of symptoms, he underwent a spinal MRI which reported the presence of a herniated L5-S1 disc. He started physiotherapy and with the worsening of symptoms, he underwent a tomography on 02/18/2015, with reports of L2-L3, L3-L4 facet arthrosis and L5-S1 discopathy with protrusion into the medullary canal and radiographs of the pelvis, figures 1 and 2.

Total Humerus Prosthesis Technique in Osteosarcoma.

Figura 1: Radiografia do úmero esquerdo frente, evidenciando a lesão meta epifisária com grande componente extracortical. O tumor estende-se distalmente pela diáfise umeral.
Figure 1: Radiograph of the front left humerus, showing the meta-epiphyseal lesion with a large extracortical component. The tumor extends distally through the humeral shaft.
Figura 2: Radiografia do úmero esquerdo oblíqua, com mineralização da lesão por resposta favorável à quimioterapia pré-operatória.
Figure 2: Oblique radiograph of the left humerus, with mineralization of the lesion due to a favorable response to preoperative chemotherapy.
Figura 3: Laudo da radiografia do úmero esquerdo.
Figure 3: X-ray report of the left humerus.
Figura 4: Cintilografia evidenciando a lesão proximal do úmero esquerdo, vista anterior.
Figure 4: Scintigraphy showing the proximal lesion of the left humerus, anterior view.
Figura 5: Cintilografia do úmero esquerdo, vista posterior.
Figure 5: Scintigraphy of the left humerus, posterior view.
Figura 6: Cintilografia colorida destacando a intensa captação da lesão.
Figure 6: Color scintigraphy highlighting the intense capture of the lesion.
Figura 7: Laudo da Cintilografia óssea.
Figure 7: Bone scintigraphy report.
Figura 8: Tomografia pós quimioterapia com lesão no úmero esquerdo, obliterando o canal medular e com reação periosteal espicular.
Figure 8: Post-chemotherapy CT scan with lesion in the left humerus, obliterating the spinal canal and with spicular periosteal reaction.
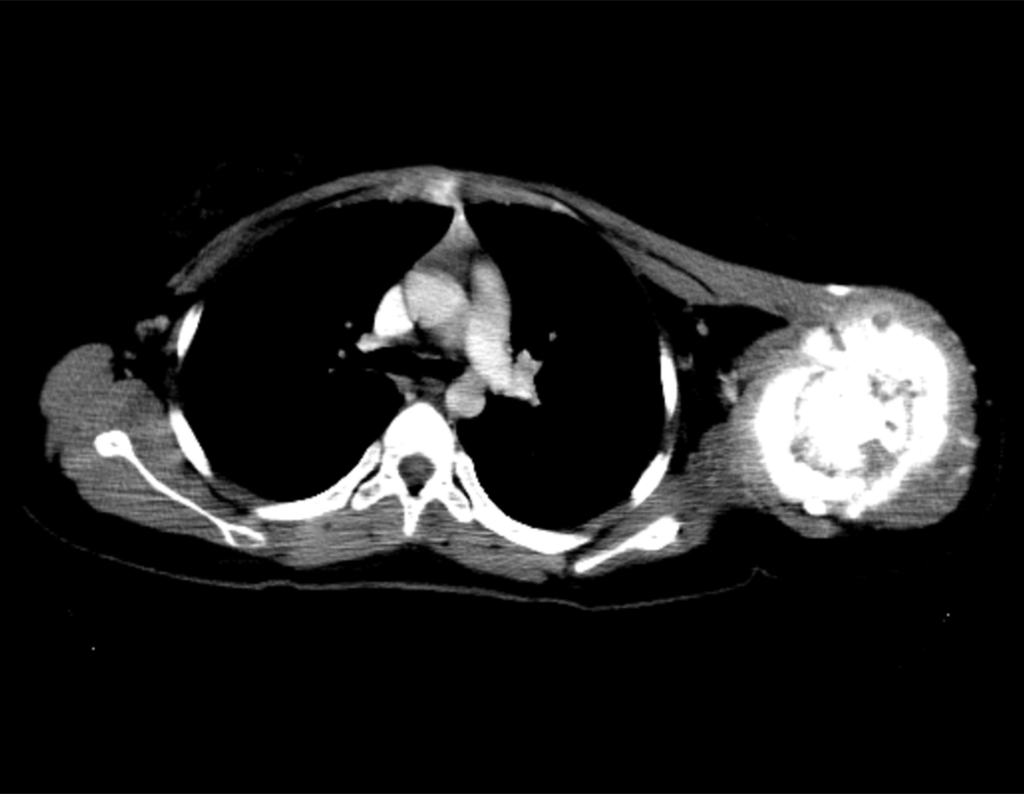
Figura 9: Grande massa tumoral estra cortical e comprometimento dos tecidos moles.
Figure 9: Large extra-cortical tumor mass and soft tissue involvement.
Figura 10: Extenso comprometimento do ombro e musculatura do deltoide.
Figure 10: Extensive involvement of the shoulder and deltoid muscles.
Figura 11: Tomografia com densidade para tecidos ósseos, ressaltando o volume tumoral.
Figure 11: Tomography with density for bone tissue, highlighting the tumor volume.
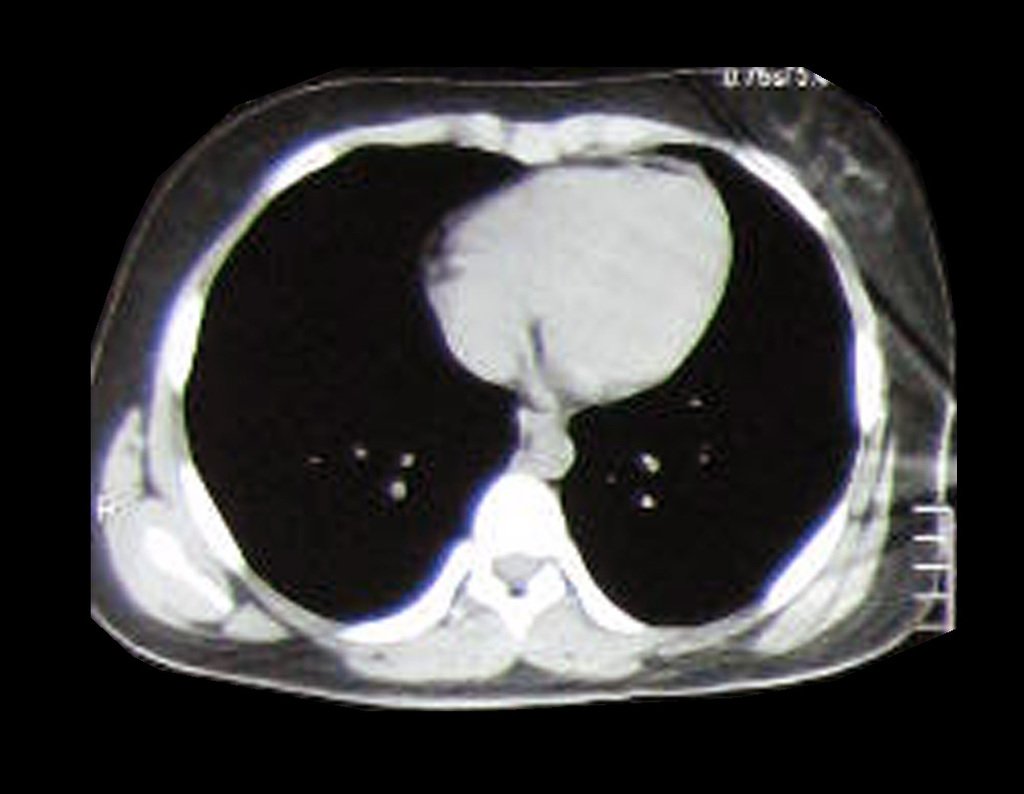
Figura 12: Tomografia do tórax evidenciando nódulo pulmonar no lado esquerdo.
Figure 12: Chest tomography showing a pulmonary nodule on the left side.
Figura 13: Laudo da tomografia, relatando a presença de nódulos pulmonares.
Figure 13: CT report, reporting the presence of pulmonary nodules.
Figura 14: RM sag T1 supr.
Figure 14: RM sag T1 supr.
Figura 15: RM cor T1.
Figure 15: RM cor T1.
Figura 16: RM cor T1 supr.
Figure 16: RM cor T1 supr.
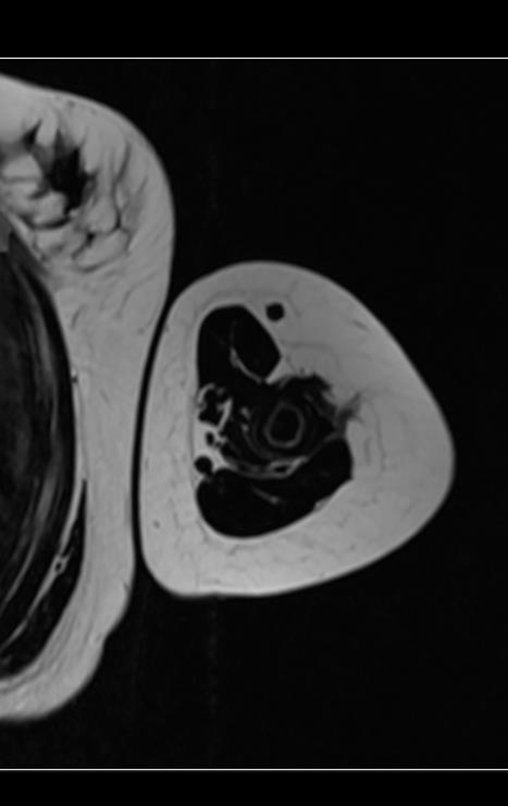
Figura 17: RM axial T1.
Figure 17: RM axial T1.
Figura 18: RM axial T1.
Figure 18: RM axial T1.
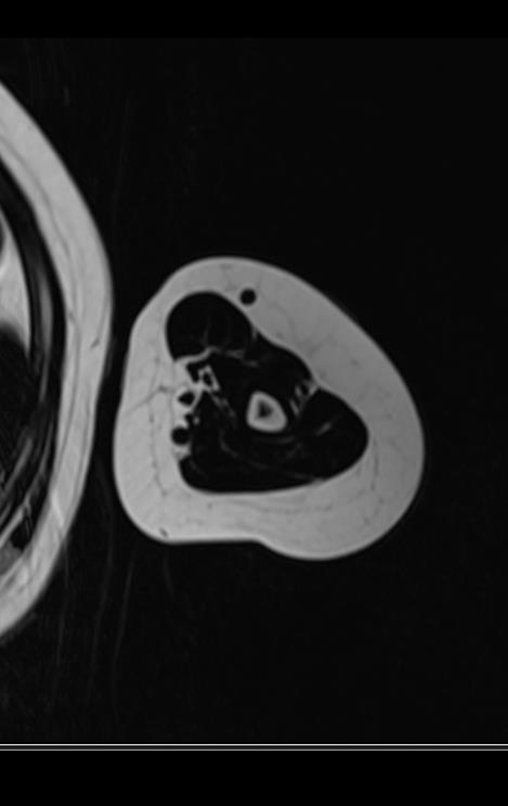
Figura 19: RM axial T1.
Figure 19: RM axial T1.
Figura 20: RM axial T1.
Figure 20: RM axial T1.
Figura 21: RM axial T1.
Figure 21: RM axial T1.
Figura 22: RM axial T1.
Figure 22: RM axial T1.
Figura 23: RM axial T1.
Figure 23: RM axial T1.
Figura 24: RM axial T1.
Figure 24: RM axial T1.
Figura 25: RM sag. T1.
Figure 25: RM sag. T1.
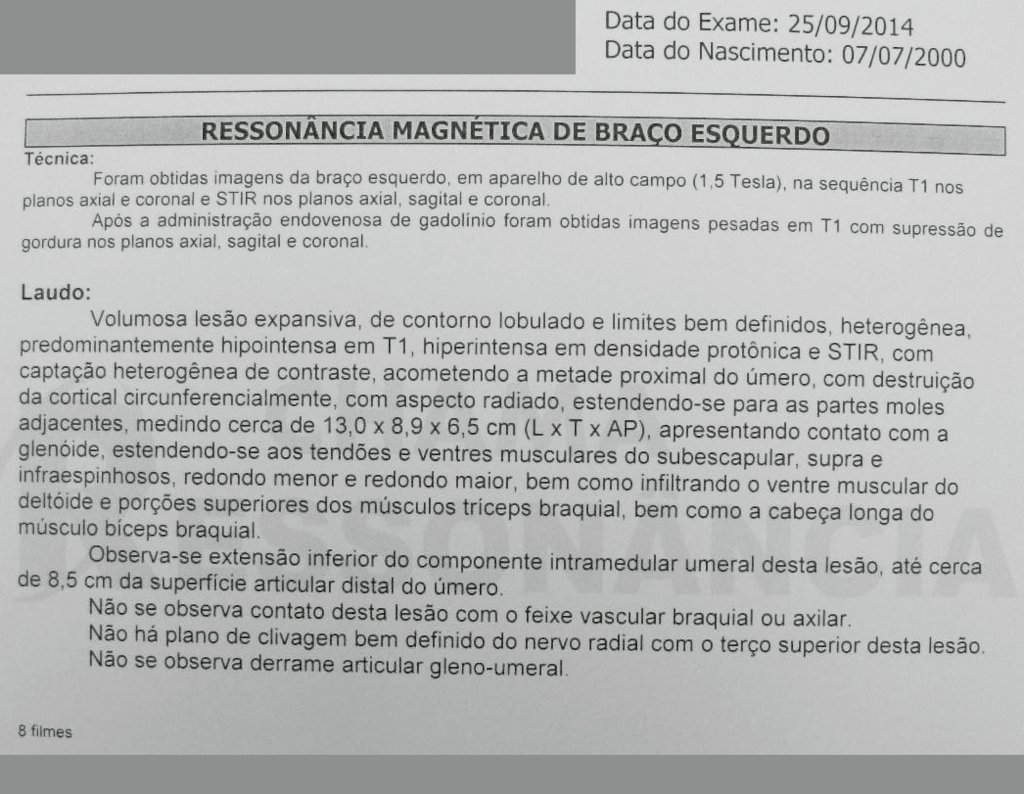
Figura 26: Laudo da RM do braço esquerdo.
Figure 26: MRI report of the left arm.
The clinical appearance and function of the left upper limb can be seen in figures 27 to 29.
Figura 27: Aspecto clínico após a quimioterapia de indução.
Figure 27: Clinical appearance after induction chemotherapy.
Figura 28: Paciente mostrando o grau de elevação dos membros superiores.
Figure 28: Patient showing the degree of elevation of the upper limbs.
Figura 29: Rotação interna com mobilidade satisfatória.
Figure 29: Internal rotation with satisfactory mobility.
Figura 30: Laudo do quadro histológico.
Figure 30: Histological report.
The study of the images and the analysis of the clinical examination showed the involvement of the deltoid muscle, but with the feasibility of conservative surgery, with margin, as long as the involved muscle was completely resected and the humerus was completely replaced with a modular polyethylene endoprosthesis. Despite the need for partial functional sacrifice of the shoulder, and the need for arthroplastic reconstruction, with Marlex mesh for proximal coverage of the prosthesis and stability of the shoulder, preservation of the upper limb was our indication, aiming to offer a remaining cosmetic and functional aspect of the shoulder. satisfactory member. Total resection surgery of the left humerus, including the entire deltoid muscle, and reconstruction with endoprosthesis and Marlex mesh can be studied in figures 31 to 75.
Figura 31: Paciente em posição semi sentada, "em posição de cadeira de praia".
Figure 31: Patient in a semi-sitting position, "in beach chair position".
Figura 32: Incisão deltopeitoral, que se estende lateral e distalmente até o epicôndilo lateral do úmero.
Figure 32: Deltopectoral incision, which extends laterally and distally to the lateral epicondyle of the humerus.
Figura 33: Dissecção de pele e subcutâneo, contornando o trajeto da biópsia e realização de hemostasia com eletrocautério.
Figure 33: Skin and subcutaneous dissection, bypassing the biopsy path and performing hemostasis with electrocautery.
Figura 34: Exposição do epicondilo lateral do úmero, que está distante do comprometimento tumoral na diáfise.
Figure 34: Exposure of the lateral epicondyle of the humerus, which is distant from the tumor involvement in the diaphysis.
Figura 35: Dissecção e descolamento da porção inferior e lateral do tríceps e do braquial, descolando o periósteo e expondo a extremidade distal do úmero.
Figure 35: Dissection and detachment of the lower and lateral portion of the triceps and brachialis, detaching the periosteum and exposing the distal end of the humerus.
Figura 36: Dissecção cuidadosa do nervo radial, com pequena faixa de tecido muscular, preservando a irrigação e integridade do nervo.
Figure 36: Careful dissection of the radial nerve, with a small strip of muscle tissue, preserving the irrigation and integrity of the nerve.
Figura 37: Abertura da cápsula articular do cotovelo na face anterior e medial.
Figure 37: Opening of the elbow joint capsule on the anterior and medial surface.
Figura 38: Liberação da cápsula posterior e do nervo ulnar, para a segura luxação do cotovelo.
Figure 38: Release of the posterior capsule and ulnar nerve, for safe dislocation of the elbow.
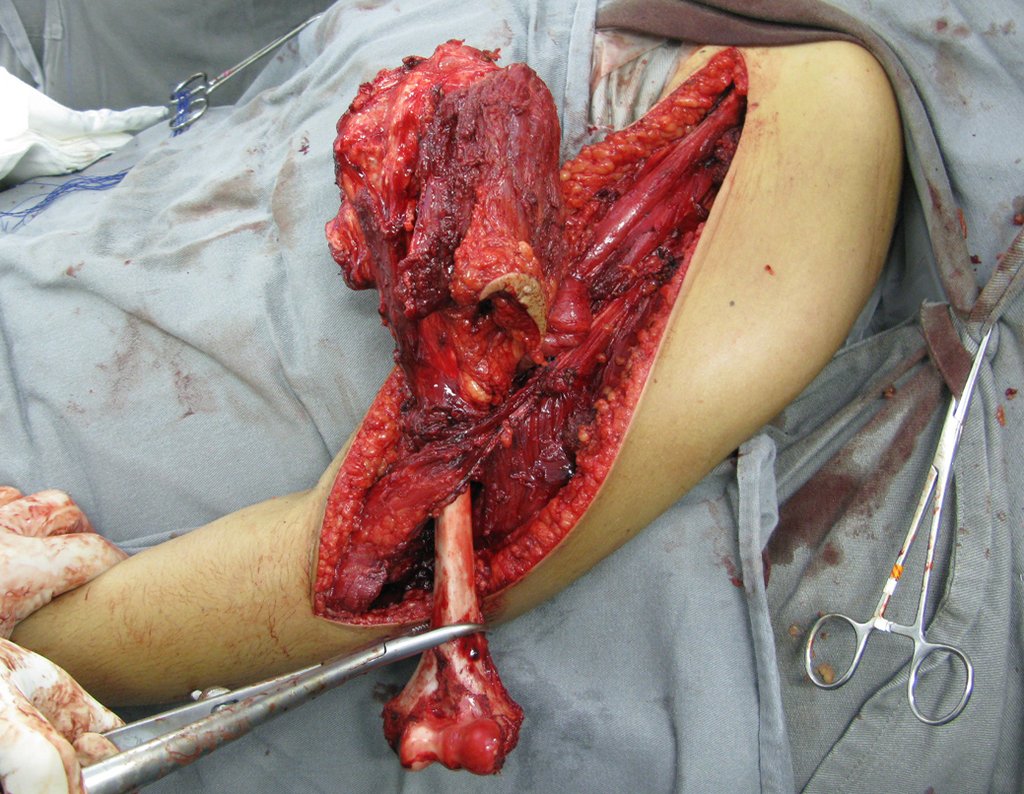
Figura 39: Com o auxílio de uma pinça de osso, fazemos a rotação interna do úmero e procedemos o descolamento da pele e subcutâneo do músculo deltoide, que será totalmente ressecado como margem de segurança em tecidos moles. Neste descolamento utilizamos o eletrocautério, realizando uma cuidadosa hemostasia.
Figure 39: With the help of a bone forceps, we internally rotate the humerus and detach the skin and subcutaneous tissue of the deltoid muscle, which will be completely resected as a safety margin in soft tissues. In this detachment we use electrocautery, performing careful hemostasis.
Figura 40: Após a exposição circunferencial do deltoide, abrimos a cápsula da articulação gleno-umeral e seccionamos, neste caso, o tendão do cabo longo do bíceps. A pele, o sub-cutâneo e todo o trajeto da biópsia permanecem aderidos à peça cirúrgica, que será removida em bloco, com boa margem oncológica.
Figure 40: After circumferential exposure of the deltoid, we opened the capsule of the glenohumeral joint and sectioned, in this case, the long cable tendon of the biceps. The skin, subcutaneous tissue and the entire biopsy path remain adhered to the surgical specimen, which will be removed en bloc, with a good oncological margin.
Figura 41: Após a secção do cabo longo do bíceps, realizamos a rotação interna do úmero e seccionamos a cápsula proximal.
Figure 41: After sectioning the long cable of the biceps, we performed internal rotation of the humerus and sectioned the proximal capsule.
Figura 42: A seguir realizamos rotação externa, completamos a capsulotomia anterior e iniciamos a liberação do feixe vasculo nervoso.
Figure 42: Next, we perform external rotation, complete the anterior capsulotomy and begin releasing the vascular-nervous bundle.
Figura 43: Liberação do feixe vascular. A pinça aponta o nervo radial, contornando o úmero.
Figure 43: Release of the vascular bundle. The forceps target the radial nerve, bypassing the humerus.
Figura 44: Liberação dos tecidos moles da diáfise umeral.
Figure 44: Release of soft tissues from the humeral shaft.
Figura 45: Úmero, tumor, tecidos moles e trajeto da biópsia ressecados com margem oncológica.
Figure 45: Humerus, tumor, soft tissues and biopsy path resected with oncological margin.
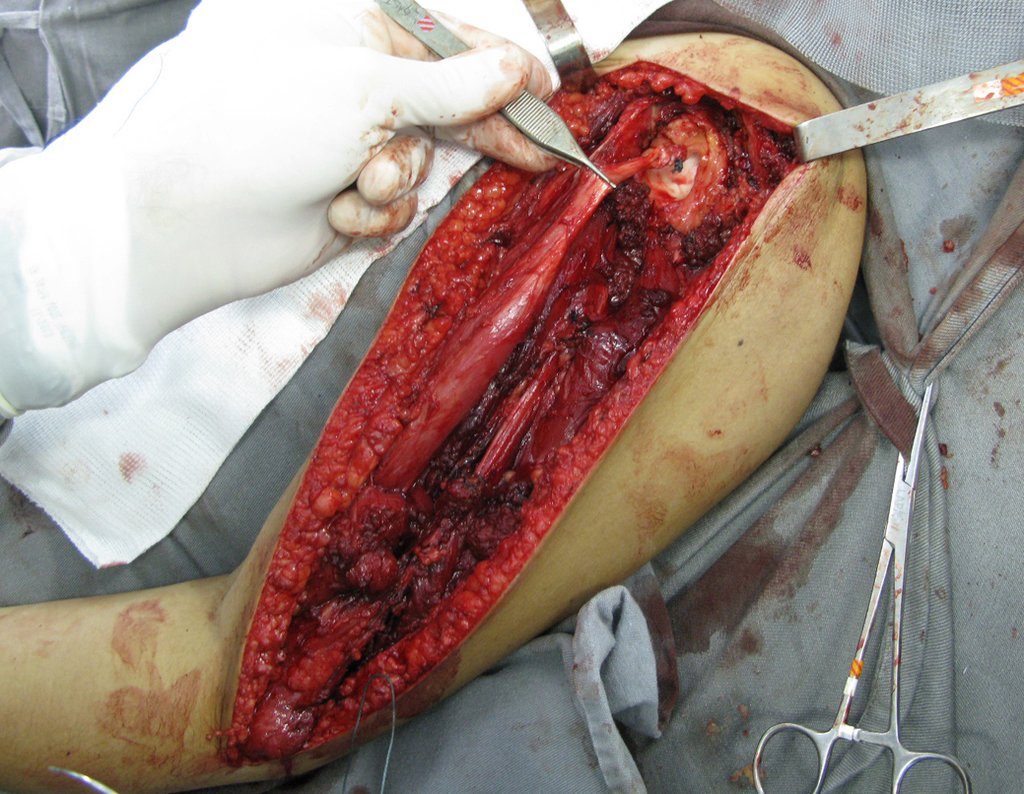
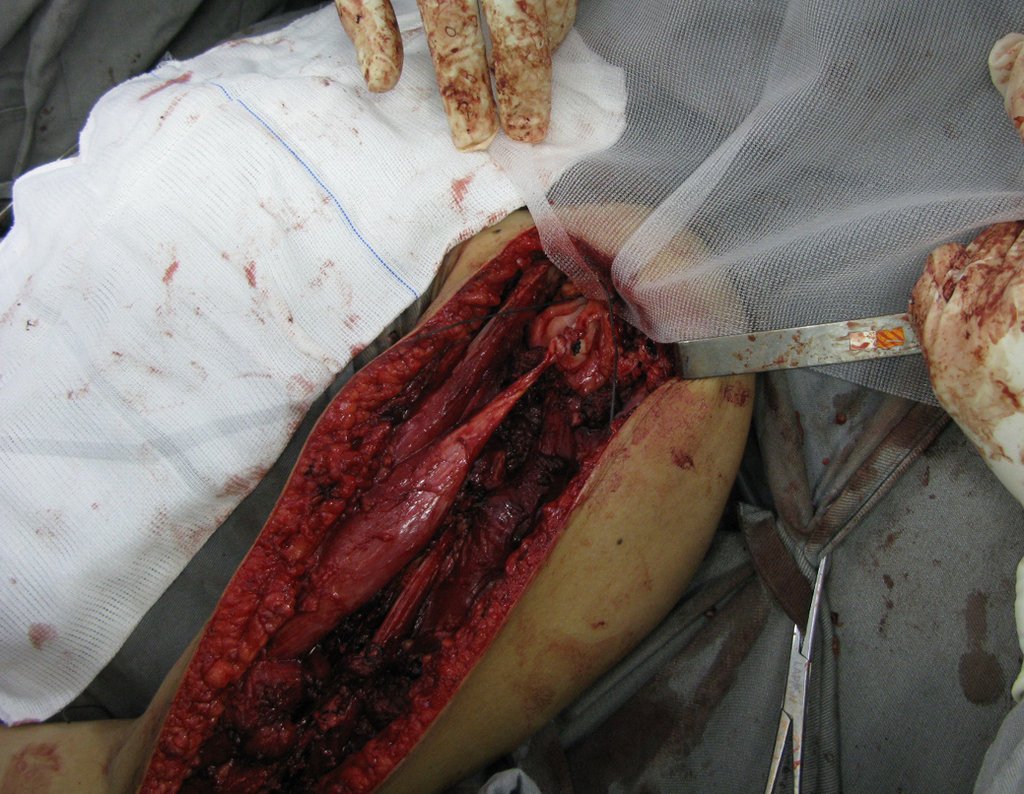
Figura 46: Leito cirúrgico após a exérese do tumor. Boa hemostasia.
Figure 46: Surgical bed after tumor excision. Good hemostasis.
Figura 47: Peça cirúrgica, face anterior.
Figure 47: Surgical specimen, anterior surface.
Figura 48: Face póstero lateral da peça cirúrgica.
Figure 48: Posterolateral aspect of the surgical specimen.
Figura 49: Reparo do coto de inserção do cabo longo do bíceps.
Figure 49: Repair of the biceps long cable insertion stump.
Figura 50: Reinserção do cabo longo do bíceps.
Figure 50: Reinsertion of the long biceps cable.
Video 1 demonstrates the reinsertion of the long cable of the biceps brachii muscle.
Video 1: Marlex mesh suture around the glenoid.
As we could see, the entire deltoid muscle and biopsy tract, along with the joint capsule, were resected. Only skin and subcutaneous cellular tissue remained for the proximal coverage of the humeral reconstruction. It is necessary to create a containment around the glenoid to stabilize the prosthesis, preventing its displacement. This containment mechanism needs to allow rotational movements of the humerus to provide adequate function. To obtain this result we will describe our technique in detail. Video 2 illustrates the suture of a Marlex mesh around the glenoid, aiming to create a fixation point for the proximal portion of the humeral prosthesis that we used in this reconstruction.
Figura 51: Sutura da tela de marlex ao redor da glenóide.
Figure 51: Marlex mesh suture around the glenoid.
Figura 52: Observem o detalhe do pregueamento que ocorre ao costurarmos uma estrutura retangular em uma esférica.
Figure 52: Observe the detail of the pleating that occurs when we sew a rectangular structure onto a spherical one.
Video 2: Fixation of the Marlex mesh on the anterior portion of the glenoid.
Figura 53: Detalhe da fixação da tela de marlex na porção anterior da glenóide, deixando internamente livre o cabo longo do bíceps.
Figure 53: Detail of the fixation of the Marlex mesh on the anterior portion of the glenoid, internally leaving the long cable of the biceps free.
Figura 54: Complementação da sutura da tela na face posterior e inferior da glenóide.
Figure 54: Complementation of the mesh suture on the posterior and inferior surface of the glenoid.
Figura 55: Posicionamento da prótese e alinhamento do cabo longo do bíceps no sulco da prótese, para teste.
Figure 55: Positioning of the prosthesis and alignment of the long biceps cable in the groove of the prosthesis, for testing.
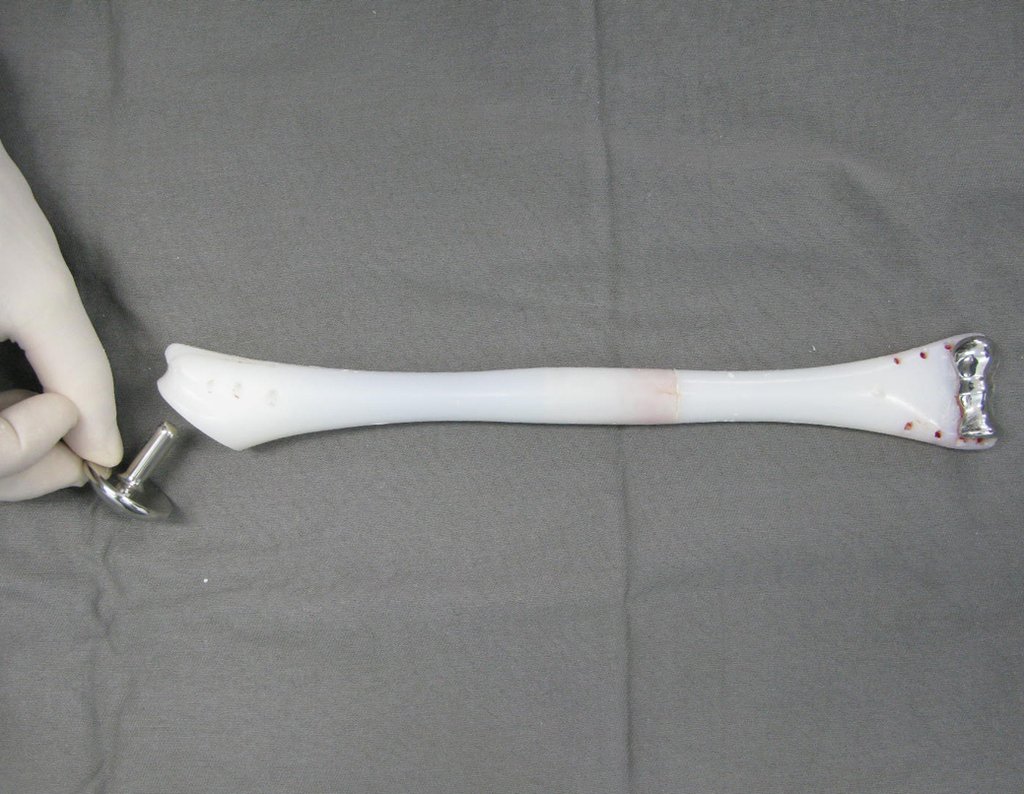
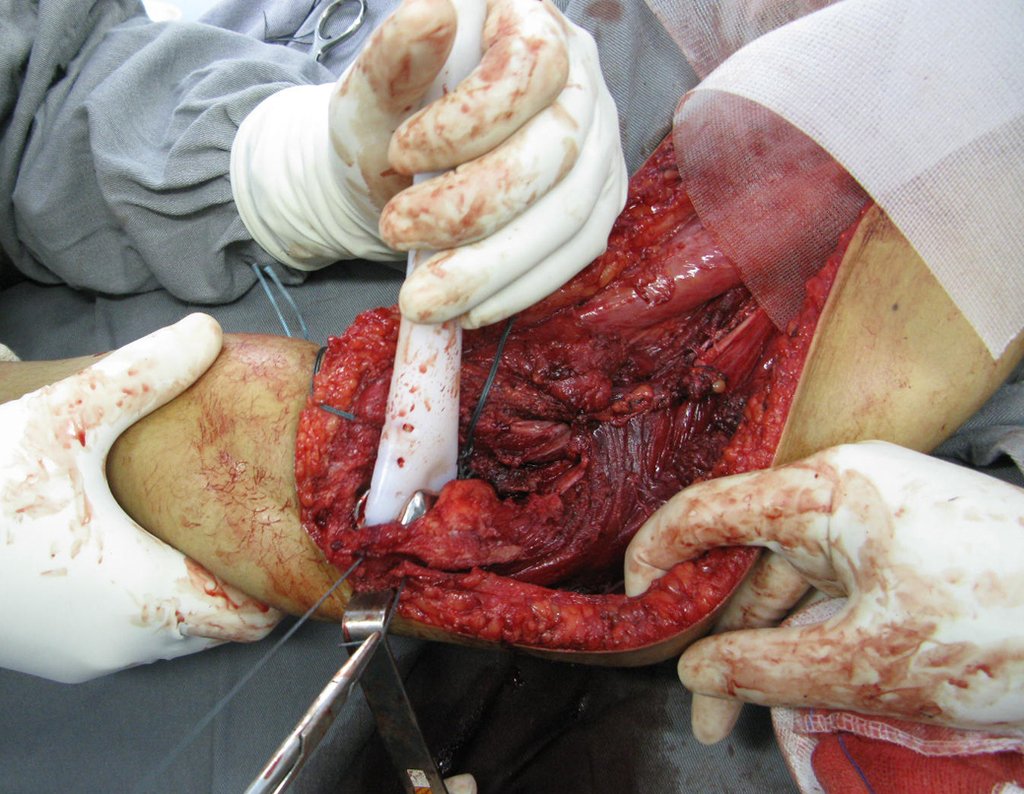
Figura 56: Prótese modular de polietileno, empregada nesta reconstrução com os seus componentes: cabeça umeral em metal, corpo de polietileno e haste proximal em titânio e corpo distal (polietileno), com articulação do cotovelo em metal.
Figure 56: Modular polyethylene prosthesis, used in this reconstruction with its components: metal humeral head, polyethylene body and titanium proximal stem and distal body (polyethylene), with metal elbow joint.
Figura 57: Detalhe do encaixe da cabeça umeral.
Figure 57: Detail of the humeral head fitting.
Figura 58: Detalhe do componente cefálico posicionado.
Figure 58: Detail of the cephalic component positioned.
Video 3: Cementation and assembly of the proximal humerus prosthesis, defining at this point 20 degrees of internal rotation. There is a distal vent for excess cement to escape.
Figura 59: Corpo proximal e distal cimentados, atentando-se para posicionar o segmento proximal em 20 graus de rotação interna, observando o alinhamento do sulco bicipital como parâmetro.
Figure 59: Proximal and distal bodies cemented, paying attention to positioning the proximal segment in 20 degrees of internal rotation, observing the alignment of the bicipital groove as a parameter.
Figura 60: A cabeça umeral tem rotação livre no corpo de polietileno. Neste caso usamos o menor tamanho, para facilitar a cobertura devido à retirada total da cápsula articular.
Figure 60: The humeral head rotates freely in the polyethylene body. In this case we used the smallest size, to facilitate coverage due to the total removal of the joint capsule.
The polyethylene prosthesis is more suitable because of its lightness compared to a fully metal one. Polyethylene has an elasticity similar to that of bone and allows us to create holes at strategic points for the reinsertion of tendons and ligaments, which may have been shortened due to the need for a surgical margin during resection.
Figura 61: Fixação do segmento distal da prótese, com a superfície metálica para substituir os côndilos umerais, na cápsula articular remanescente do cotovelo, com fios de ethibond.
Figure 61: Fixation of the distal segment of the prosthesis, with the metallic surface to replace the humeral condyles, in the remaining joint capsule of the elbow, with ethibond threads.
Figura 62: Primeiramente deixamos passados e reparados os fios aos redores da cápsula articular do cotovelo.
Figure 62: First, we leave the threads around the elbow joint capsule ironed and repaired.
Figura 63: Posicionamento e redução do cotovelo da prótese no olecrano e cabeça do rádio.
Figure 63: Positioning and reduction of the prosthetic elbow on the olecranon and radial head.
Figura 64: Passagem dos fios de ethibond nos orifícios de inserção da prótese de polietileno, iniciando pelo lado medial.
Figure 64: Passing the ethibond wires into the insertion holes of the polyethylene prosthesis, starting on the medial side.
Figura 65: Inserção da cápsula na face lateral da prótese.
Figure 65: Insertion of the capsule on the lateral surface of the prosthesis.
Figura 66: Cápsula articular do cotovelo totalmente inserida na prótese.
Figure 66: Elbow joint capsule fully inserted into the prosthesis.
Figura 67: Sutura dos tecidos moles remanescentes para o fechamento e cobertura da prótese, lado medial.
Figure 67: Suturing the remaining soft tissues to close and cover the prosthesis, medial side.
Figura 68: Fechamento e cobertura da face lateral da prótese.
Figure 68: Closing and covering the lateral face of the prosthesis.
Figura 69: Inserção do músculo braquial anterior remanescente em orifício realizado no polietileno da prótese.
Figure 69: Insertion of the remaining anterior brachialis muscle into a hole made in the polyethylene of the prosthesis.
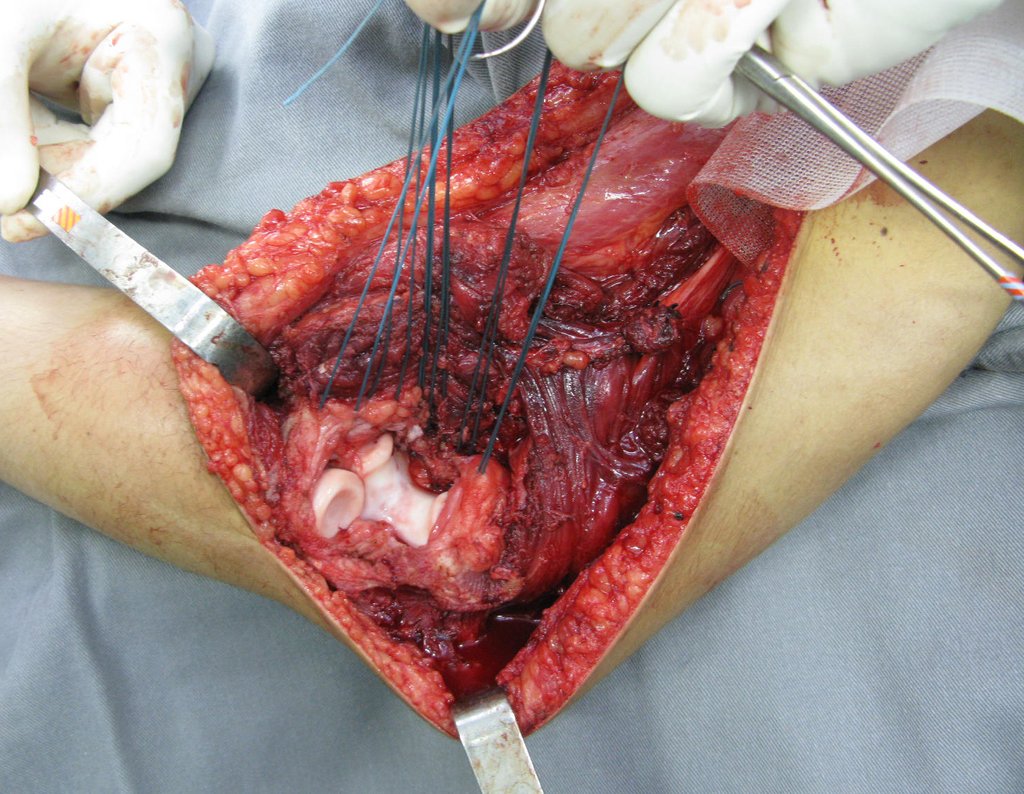
Figura 70: Redução da prótese na cavidade da glenóide, posicionamento do tendão do bíceps no sulco e cobertura com a tela de marlex que será agora fixada nos orifícios proximais de inserção da prótese.
Figure 70: Reduction of the prosthesis in the glenoid cavity, positioning of the biceps tendon in the groove and coverage with the marlex mesh that will now be fixed in the proximal insertion holes of the prosthesis.
Video 4: We demonstrated good fixation of the wires and Marlex mesh in the proximal region of the total humeral prosthesis. This suture is performed with a pleat similar to a Scottish skirt, to allow rotational movements.
Figura 71: Reconstrução finalizada, todos os tecidos moles remanescentes fixados no polietileno. Amplie a figura para observar em detalhe o túnel para o tendão do bíceps.
Figure 71: Completed reconstruction, all remaining soft tissues fixed to the polyethylene. Enlarge the figure to see the tunnel for the biceps tendon in detail.
Figura 72: Fechamento da ferida operatória.
Figure 72: Closing the surgical wound.
Figura 73: Peça ressecada.
Figure 73: Dried piece.
Figura 74: Corte da peça e mensuração.
Figure 74: Cutting the part and measuring.
Figura 75: Detalhe do corte da peça evidenciando o grande comprometimento extracortical do tumor.
Figure 75: Detail of the section of the piece showing the large extracortical involvement of the tumor.
Figura 76: Pós-operatório de uma semana, ainda com os pontos. Observem a depressão proximal devido a falta do músculo deltoide, que foi ressecado.
Figure 76: One week post-operative, still with the stitches. Note the proximal depression due to the lack of the deltoid muscle, which was resected.
Video 5: Patient one week post-operative, good cosmetic appearance, starting physiotherapy.
Figura 77: Avaliação após uma semana da cirurgia.
Figure 77: Assessment one week after surgery.
Figura 78: Pós-operatório de 15 dias.
Figure 78: 15 days post-operative period.
Figura 79: Bom aspecto da cicatriz operatória após 15 dias, retirando-se os pontos nesta ocasião.
Figure 79: Good appearance of the surgical scar after 15 days, removing the stitches on this occasion.

Vídeo 6: Função do punho após 15 dias da cirurgia. Realiza por enquanto, apenas movimentos da mão e punho.

Figura 80: Radiografia de prótese de úmero total, com ressecção do deltoide e reconstrução com tela de marlex, suturada com pregueamento para permitir os movimentos, em 22/07/2015.
Figure 80: Radiograph of total humeral prosthesis, with resection of the deltoid and reconstruction with Marlex mesh, sutured with pleating to allow movement, on 07/22/2015.
Figura 81: Cicatriz após oito meses da cirurgia.
Figure 81: Scar eight months after surgery.
Figura 82: Pós-operatório de 8 meses de ressecção de úmero total e reconstrução com endoprótese modular de polietileno.
Figure 82: Eight months postoperative period of total humerus resection and reconstruction with modular polyethylene endoprosthesis.
Figura 83: Após 9 meses de ressecção de úmero total e reconstrução com endoprótese e tela de marlex.
Figure 83: After 9 months of total humeral resection and reconstruction with endoprosthesis and Marlex mesh.
Video 7: Function in August 2015, nine months after total resection of the left humerus, with excision of the entire deltoid and reconstruction with total humeral endoprosthesis using Marlex mesh, to stabilize the prosthetic gleno joint. Good elbow flexion, excellent hand function and pronosupination and good humeral rotation.
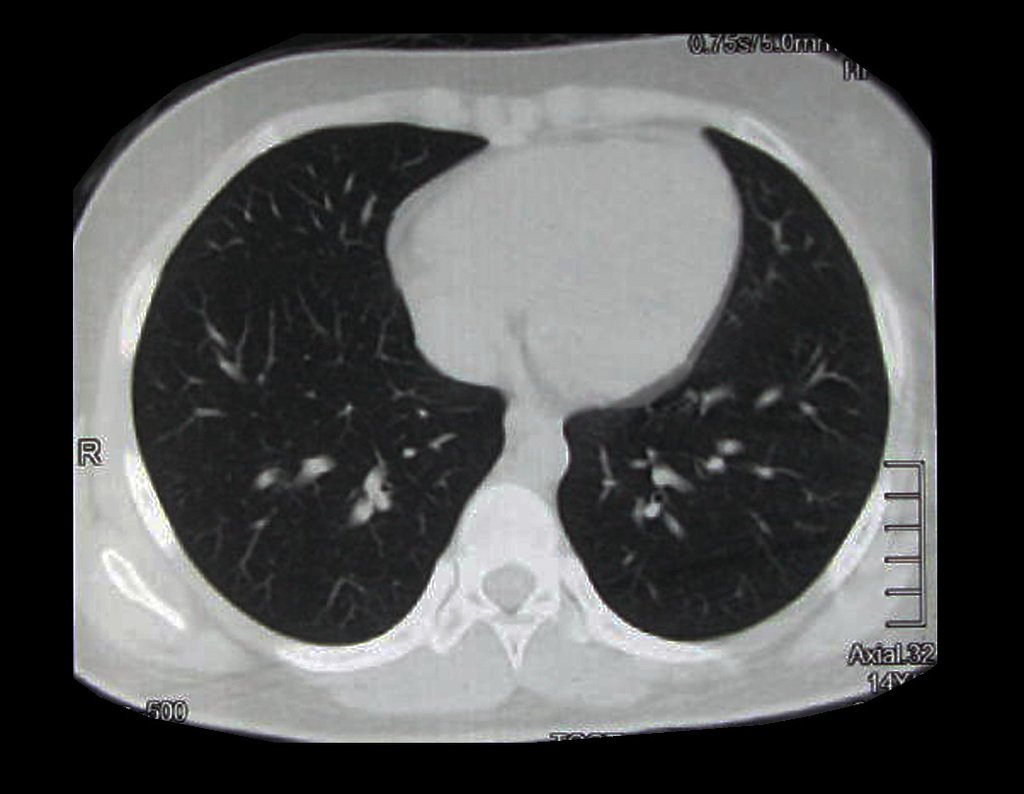
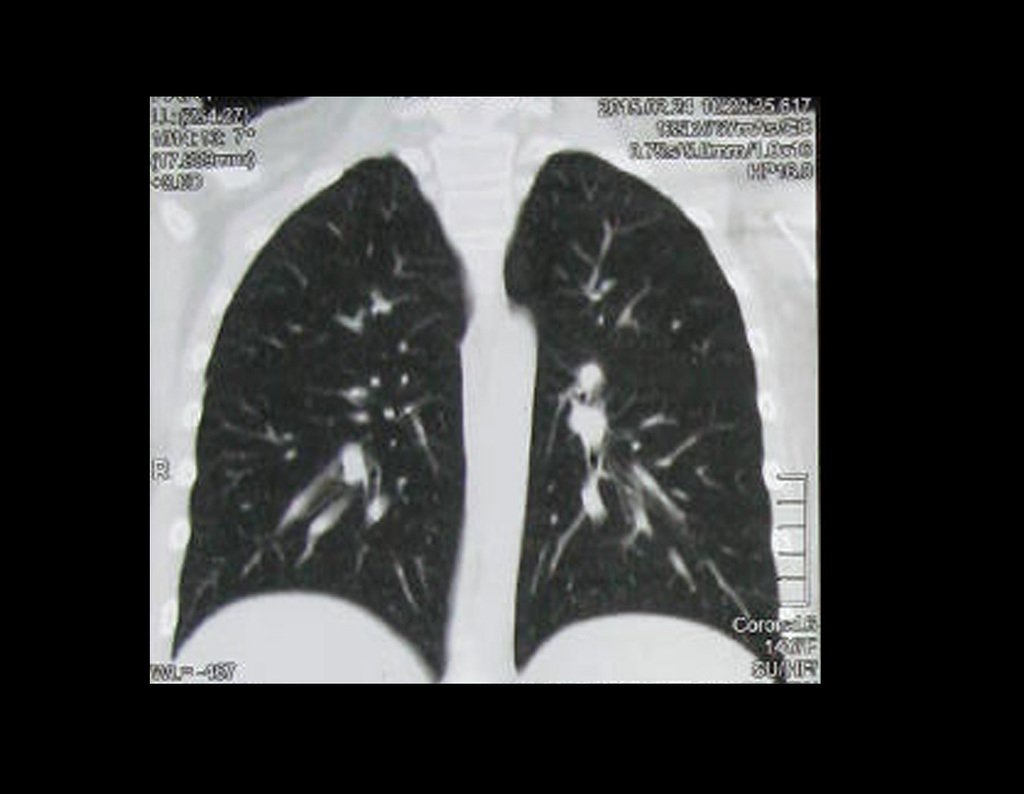
Figura 84: TM de tórax 24.02.2015.
Figure 85: Chest TM 02/24/2015.
Figura 85: TM de tórax 24.02.2015.
Figura 86: TM de tórax 24.02.2015.
Figure 86: Chest TM 02/24/2015.
Figura 87: TM de tórax 24.02.2015.
Figure 87: Chest TM 02/24/2015.
Figura 88: TM de tórax 24.02.2015.
Figure 88: Chest TM 02/24/2015.
Figura 89: Laudo em 24.02.2015.
Figure 89: Report on 02/24/2015.
Video 8: Patient in physiotherapy, flexing the shoulder with the help of the contralateral limb, on 09/09/2015
Video 9: Shoulder elevation with the help of the ball and support on the wall, on 09-09-2015

Author: Prof. Dr. Pedro Péricles Ribeiro Baptista

 Orthopedic Oncosurgery at the Dr. Arnaldo Vieira de Carvalho Cancer Institute

Leave a Reply

Hello! How can we assist you?