This digital library houses the book on Oncology and Orthopedic Oncosurgery.

It includes academic lectures, presentations from national and international congresses, published papers, case discussions, performed surgical procedures, and proprietary techniques developed.

The digital format was chosen because the web allows the inclusion of texts with numerous visual resources, such as images and videos, which would not be possible in a printed book.

The content is intended for students, healthcare professionals, and the general public interested in the field.

Autologous bone graft – Obtaining techniques

7f96b48eff9b7a8f8ebe955363b7b260 2

Autologous bone graft is used in various situations in orthopedics, traumatology and mainly in reconstructions of orthopedic oncological surgeries.
In bone defects, it is certainly what promotes the best and fastest bone consolidation, has the best integration and fastest remodeling.
Secondly, we can resort to homologous bone graft, bone from a tissue bank, obtained from a cadaver, which has the disadvantage of antigenicity, has a higher rate of infection, takes longer to incorporate and structural fragility can occur in the integration process. Lastly, we can mention artificial freeze-dried products, which aim to be osteoinductive.
Our objective is to publicize the technique we use to obtain the greatest amount of bone graft with the lowest morbidity.
We believe that, whenever it is possible to use the autologous graft, we will be providing the alternative that allows the best result.
When we need a small amount of graft, we don’t question its indication too much. As an example, in the case of the need to resect the proximal 3/4 of the radius, due to a tumor lesion, which we intend to resolve by performing a distal radio-ulnar “synostosis”, figures 1 to 4.

Autologous bone graft – Obtaining techniques

Figura 1: Radiografias do antebraço com lesão nos 2/3 proximais do rádio devido à sarcoma de Ewing, pré quimioterapia acima, e pós quimio pré operatória abaixo.
Figure 1: Radiographs of the forearm with damage to the proximal 2/3 of the radius due to Ewing's sarcoma, pre-chemotherapy above, and post-preoperative chemotherapy below.
Figura 2: Intraoperatório, ressecção de 3/4 do segmento proximal do rádio. A seta amarela assinala a interposição de enxerto ósseo autólogo.
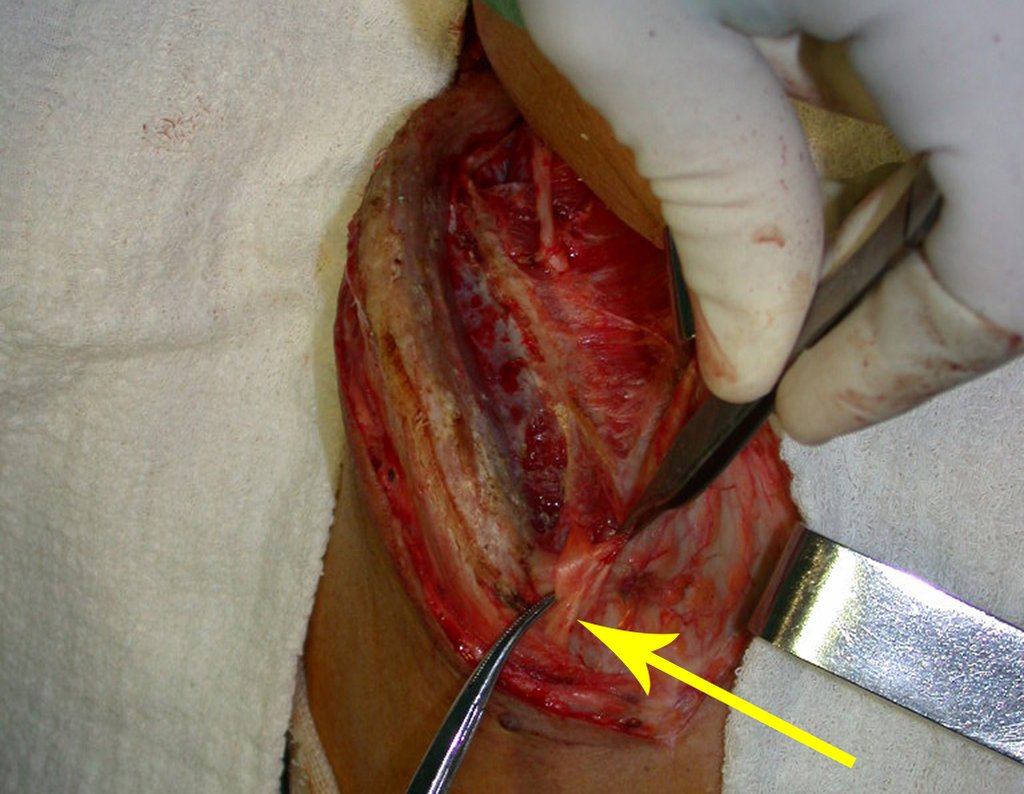
Figure 2: Intraoperatively, resection of 3/4 of the proximal segment of the radius. The yellow arrow indicates the interposition of an autologous bone graft.
When we need Reconstruction with opening of the distal radio-ulnar syndesmosis, interposition of an autologous bone graft and fixation with two fragmentary Inter screws, figure 2. Three years after performing the distal radio-ulnar synostosis, we can verify the consolidation, the total integration of the graft and observe that the radius and ulna phases continue with symmetrical growth, with good function, figures 3 and 4.
Figura 3: Radiografia após três anos da sinostose radio ulnar distal. Consolidação e total integração do enxerto. As fases do rádio e da ulna continuam com crescimento simétrico.
Figure 3: Radiograph after three years of distal radio-ulnar synostosis. Consolidation and total integration of the graft. The radius and ulna phases continue with symmetrical growth.
Figura 4: Paciente após a cirurgia, boa flexão dorsal, boa flexão volar e, após anos, observamos uma boa função do punho no paciente já adulto.
Figure 4: Patient after surgery, good dorsal flexion, good volar flexion and, after years, we observed good wrist function in the adult patient.

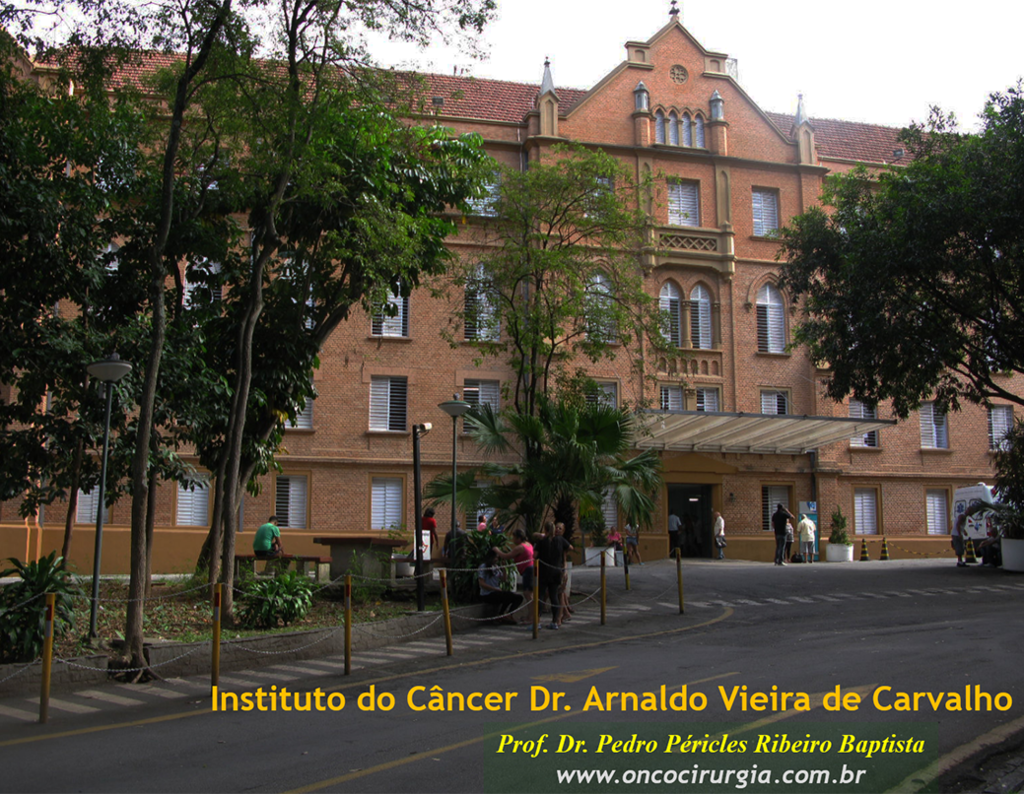
Há três décadas atuamos no Instituto do Câncer Dr. Arnaldo Vieira de Carvalho, o primeiro Hospital do Câncer do Brasil, completando 95 anos neste ano de 2016, figura 5 e 6.

Figura 5: Instituto do Câncer Dr Arnaldo Vieira de Carvalho, o primeiro Hospital do Câncer do Brasil, fundado em 1921
Figure 5: Dr Arnaldo Vieira de Carvalho Cancer Institute, the first Cancer Hospital in Brazil, founded in 1921
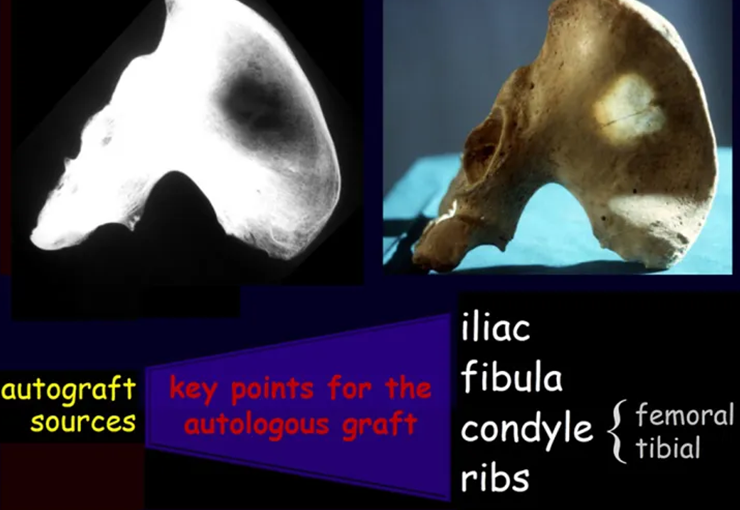
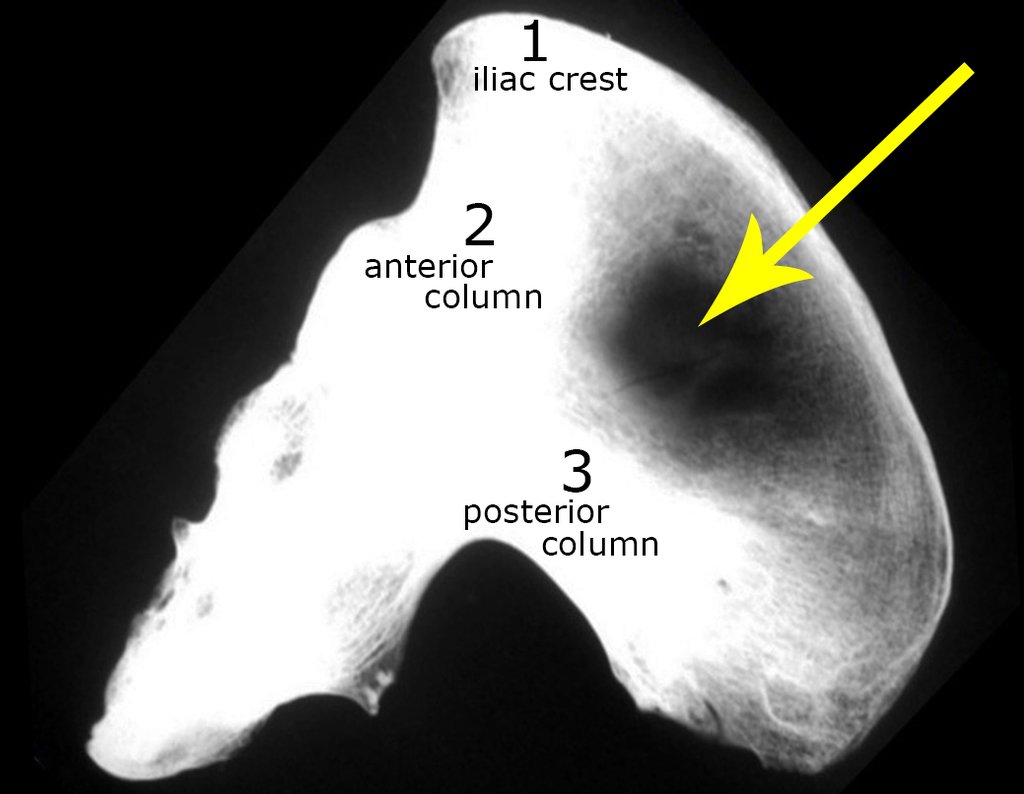
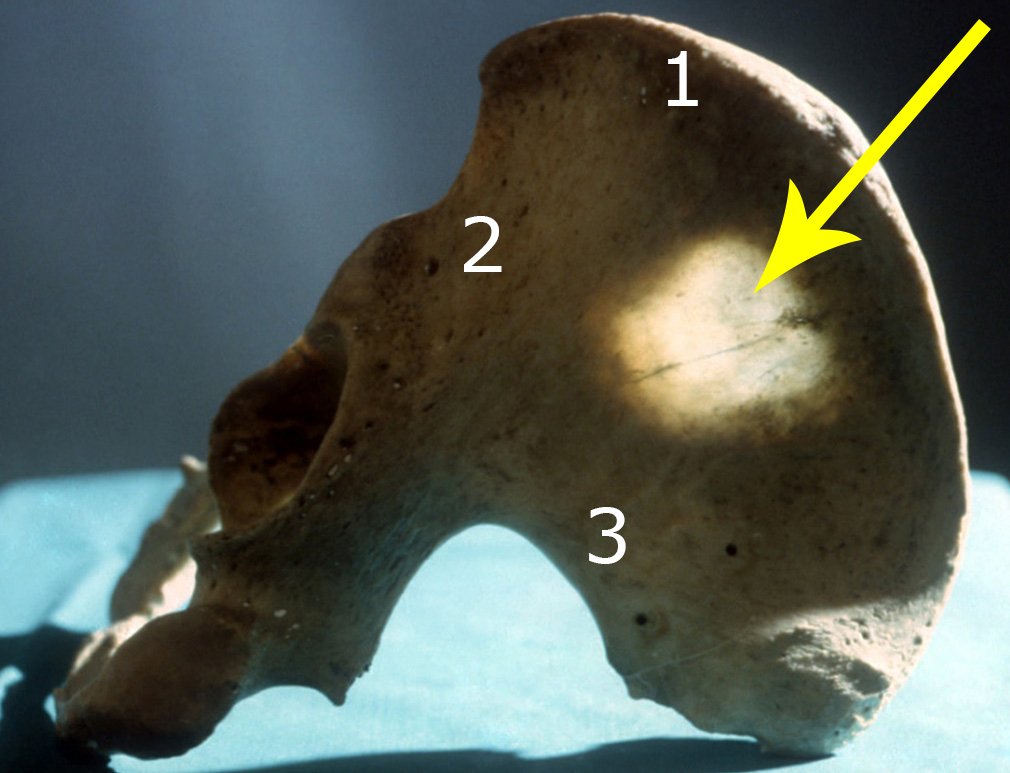
Figura 6: Radiografia da pelve evidenciando área mais escura na asa do ilíaco, correspondente à baixa densidade óssea. Pelve com trans iluminação mostrando que naquela área central as tábuas interna e externa se fundem. Nesta zona NÃO há enxerto.
Figure 6: X-ray of the pelvis showing a darker area on the iliac wing, corresponding to low bone density. Pelvis with trans lighting showing that in that central area the inner and outer boards merge. There is NO graft in this area.
The need to obtain grafts in quantity, to make major biological reconstructions viable, made us improve the surgical technique to obtain autologous grafts with less morbidity and in significantly greater quantities. Is it possible to obtain an autologous bone graft to fill a large bone defect, of just one internal plate of the iliac, like the one in figure 7? Let’s demonstrate that yes, it is possible, figure 8.
Figura 7: É possível obter enxerto ósseo autólogo para preencher toda esta falha óssea, de apenas uma tábua interna do ilíaco?
Figure 7: Is it possible to obtain an autologous bone graft to fill this entire bone gap, from just one internal table of the iliac bone?
Figura 8: Radiografia de reconstrução com enxerto autólogo obtido de uma única tábua do osso ilíaco. Flexão com carga total após oito meses.
Figure 8: Radiograph of reconstruction with autologous graft obtained from a single table of the iliac bone. Flexion with full load after eight months.
Video 1: We can obtain as much autologous graft from the iliac bone as the abundant water in this stream. – Algonquin Park Ontario Canada.
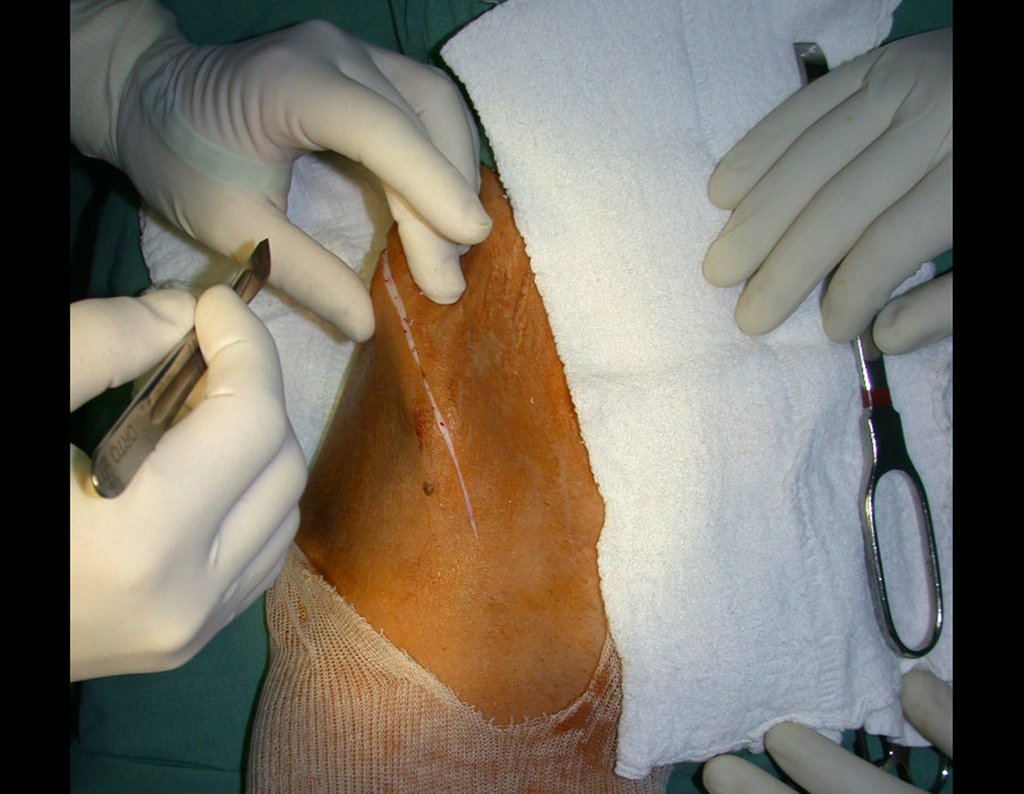
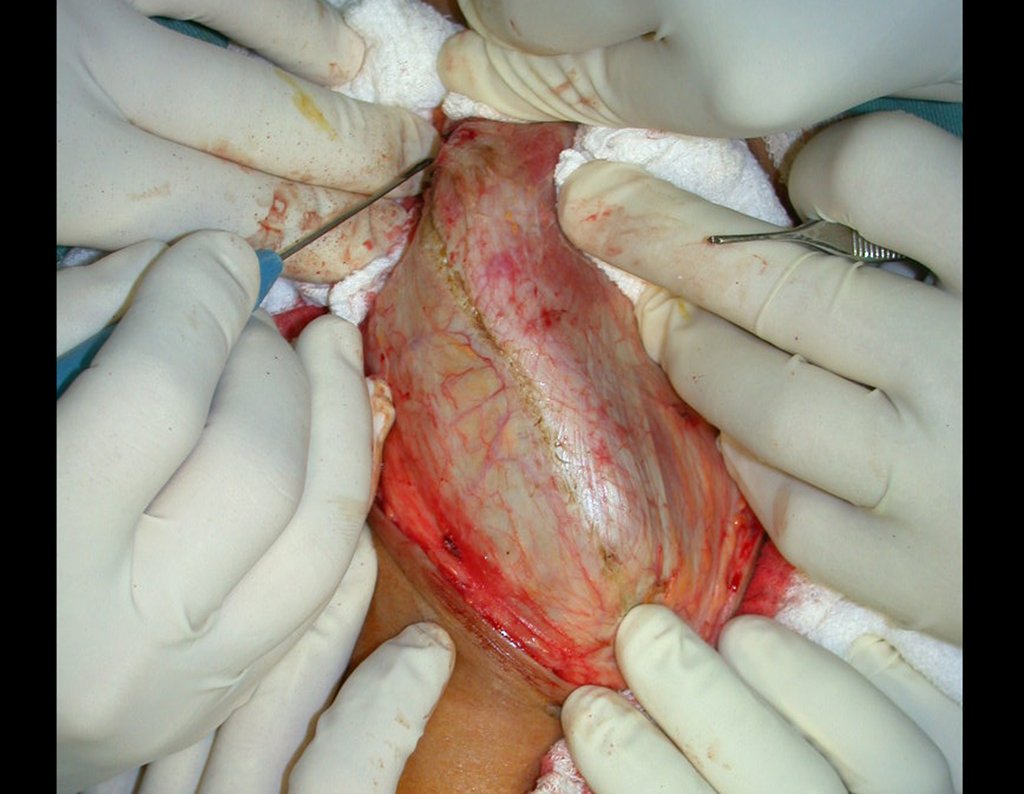
The graft obtained must be applied in the reconstruction in order to avoid the formation of pseudoarthrosis lines, which will be explained later. The key points and technique for obtaining a good graft from the iliac bone are described in figures The incision must be superficial, only in the skin and subcutaneous tissue, so as not to damage the lateral femoral cutaneous sensory nerve. Before proceeding with the dissection, we carefully cauterized the subcutaneous vessels with electrocautery. figures 9 and 10.
Figura 9: Ampla incisão superficial, apenas na pele e tecido subcutâneo, para não lesar o nervo sensitivo fêmur cutâneo lateral, para obtenção de enxerto ósseo.
Figure 9: Wide superficial incision, only in the skin and subcutaneous tissue, so as not to damage the lateral femoral cutaneous sensory nerve, to obtain a bone graft.
Figura 10: Hemostasia com cuidadosa cauterização dos vasos do subcutâneo.
Figure 10: Hemostasis with careful cauterization of the subcutaneous vessels.
Figura 11: Realiza-se o descolamento do sub-cutâneo lateral e medialmente, nova hemostasia e com o bistuti elétrico desinserimos os músculos oblíquo do abdomem e ilíaco.
Figure 11: The lateral and medial subcutaneous tissue is detached, new hemostasis is achieved and the abdominal oblique and iliac muscles are removed using an electric scalpel.
Figura 12: Esta desinserção inicia-se anteriormente por sobre a crista ilíaca e vai desviando para lateral póstero-inferiormente à crista.
Figure 12: This disinsertion begins anteriorly above the iliac crest and deviates laterally postero-inferior to the crest.
Figura 13: Desinserimos o músculo ilíaco da espinha ilíaca antero superior e rebatemos cuidadosamente o nervo sensitivo fêmoro cutâneo lateral da coxa.
Figure 13: We detach the iliacus muscle from the anterior superior iliac spine and carefully retract the lateral femorocutaneous sensory nerve of the thigh.
Figura 14: Com uma gase "ruginamos" o perimísio do músculo ilíaco, separando-o da tábua interna.
Figure 14: Using gas, we "roar" the perimysium of the iliac muscle, separating it from the internal table.
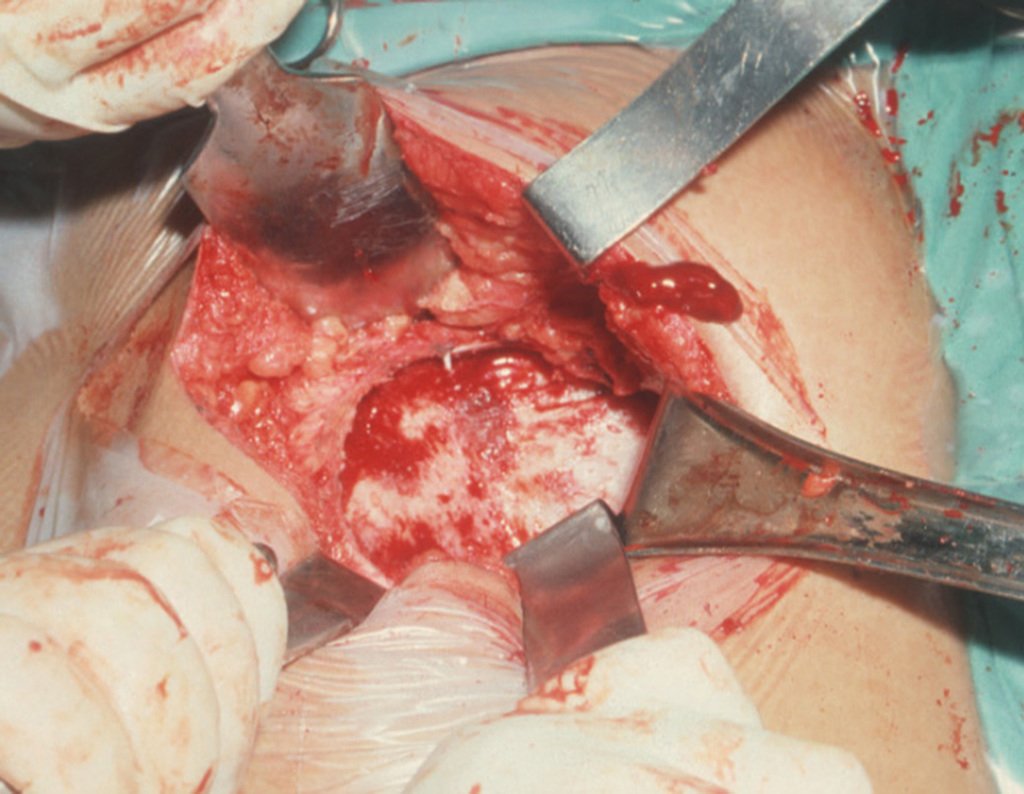
At this stage, with the detachment of the thin periosteum, there are a large number of nutrient vessels that begin to flow blood. These must be obliterated with bone tissue hemostatic, aiming to buffer them. We need to notice that there is a small area of ​​the iliac bone where the external and internal plates are very close, almost fused. In this small “island” there is no graft (marked by the yellow arrow), figure 15. After this adequate hemostasis, we place the tip of a compress in the greater sciatic notch and leave it over the sacroiliac, to dam the blood and the graft . We begin with an osteotome to remove the upper cortex of the iliac crest. We must begin graft removal with controlled hemostasis, figure 16.
Figura 15: Hemostasia da tábua interna. Calibrosa artéria nutrícia, que é obliterada com cera para osso, seta vermelha. A seta amarela assinala a região clara, onde a tábua interna e a externa se fundem. NÃO HÁ ENXERTO AÍ!
Figure 15: Hemostasis of the inner table. Large nutrient artery, which is obliterated with bone wax, red arrow. The yellow arrow marks the light region, where the inner and outer boards merge. THERE IS NO GRAFTING THERE!
Figura 16: Retirada da cortical superior da crista ilíaca, com osteótomo. Boa hemostasia, sangramento controlado.
Figure 16: Removal of the upper cortex of the iliac crest, with an osteotome. Good hemostasis, controlled bleeding.
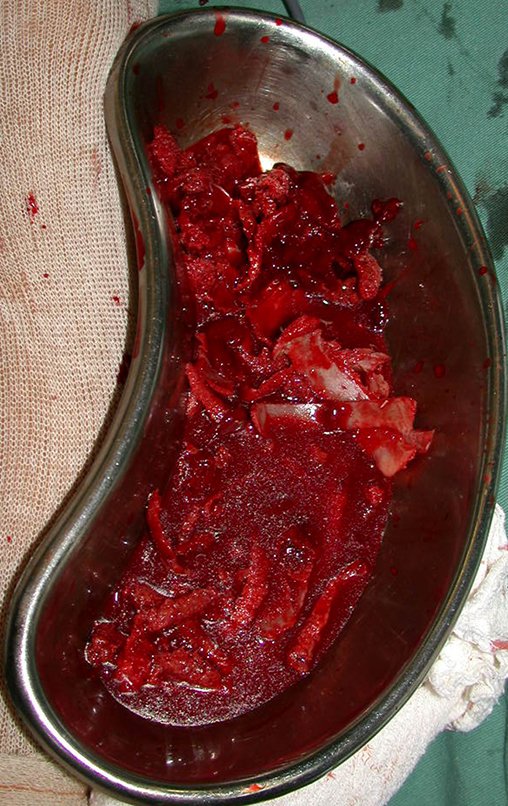
With curved and sharp osteotomes, modeled on the anatomy of the region, we remove the inner cortex in the thinnest layer possible. Exposure of the spongy tissue allows blood to drain. This blood should not be aspirated, it should be allowed to collect at the bottom, forming a clot. This collected blood has potent toti cells. It will be collected with a compress and placed in a vat where we will store the obtained graft, nourishing and preserving it, figures 17 to 19.
Figura 17: Retirada da cortical interna em camada a mais fina possível. Coágulo ao fundo proveniente do sangue que escorre ao retirar-se a cortical. NÃO deve ser aspirado.
Figure 17: Removal of the inner cortex in the thinnest possible layer. Clot at the bottom originating from the blood that drains when the cortex is removed. It should NOT be vacuumed.
Figura 18: Esquema ilustrativo da retirada da cortical da tábua interna do ilíaco. Vamos retirando a cortical que não está coberta pelo coágulo coletado no fundo.
Figure 18: Illustrative diagram of the removal of the cortex from the internal table of the iliac. We are removing the cortex that is not covered by the clot collected at the bottom.
Figura 19: Esquema ilustrando a cortical interna retirada, contornando a área sem enxerto, para não perfurar o osso ilíaco.
Figure 19: Scheme illustrating the internal cortex removed, bypassing the area without a graft, so as not to perforate the iliac bone.

After removing the entire inner cortex, we store the graft in a vat, soaked by the collected clot, thus preserving the totipotent cells, which will also be placed in the bone defect. Next, with a sharp chisel and WITHOUT using a hammer, we proceed with the removal of the spongy iliac bone, figures 20 to 23.

Figura 20: Tábua interna do ilíaco com todo o osso esponjoso exposto, após a retirada da cortical interna.
Figure 20: Internal plate of the iliac bone with all the cancellous bone exposed, after removal of the internal cortex.
Figura 21: Devemos retirar o enxerto esponjoso "RASPANDO" o osso com formão afiado, com ligeiros movimentos de pressão e rotação. Não se deve bater com martelo.
Figure 21: We must remove the cancellous graft by "SCRAPPING" the bone with a sharp chisel, with slight pressure and rotation movements. Do not hit with a hammer.
Figura 22: Osso esponjoso sendo recolhido com pinça. Não se aspira o sangue, coleta-se o coágulo com compressa, à medida que houver necessidade de visualizar a profundidade, para coletar mais enxerto.
Figure 22: Cancellous bone being collected with forceps. The blood is not aspirated, the clot is collected with a compress, as there is a need to visualize the depth, to collect more graft.
Figura 23: Após o emprego de formões afiados, completamos a raspagem com curetas.
Figure 23: After using sharp chisels, we completed the scraping with curettes.
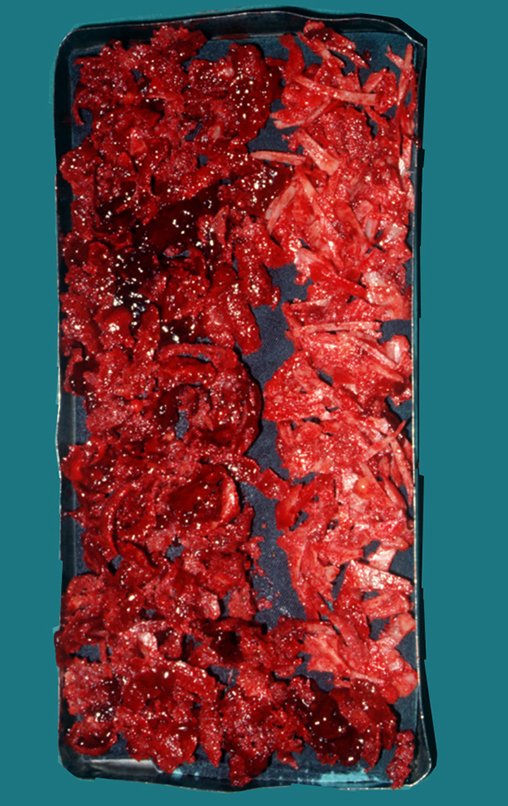
With this care in collecting the graft, without the use of a hammer, by “scraping” the internal table, already decorticated, we do not drill the bone and maintain the iliac anatomy as much as possible, figure 24. The graft obtained is placed in a vat together with the collected blood, preserving the nutrition of the totipotent cells by imbibition, figure 25. This graft must be fixed, mixing the cortical bone material obtained with the spongy part, to be placed in the bone gap, figure 26. In the gaps segments, we must obtain splinters and intertwine them, making a tie, as a bricklayer lays bricks when building a wall, avoiding the formation of traces of pseudarthrosis, figure 27.
Figura 24: Enxerto retirado, sem lesar a "ilha" formada pela tábua interna e externa intactas, seta amarela. Setas brancas: 1- crista ilíaca, 2- teto acetabular e 3- coluna posterior, de onde foi retirado enxerto.
Figure 24: Graft removed, without damaging the "island" formed by the intact inner and outer plank, yellow arrow. White arrows: 1- iliac crest, 2- acetabular roof and 3- posterior column, from where the graft was removed.
Figura 25: Enxerto autólogo, retirado de uma tábua anterior interna do ilíaco.
Figure 25: Autologous graft, taken from an internal anterior table of the iliac.
Figura 26: O enxerto autólogo é dimensionado e mesclado, o osso esponjoso com o osso cortical obtido, para a reconstrução de 18 cm de falha óssea.
Figure 26: The autologous graft is sized and merged, the cancellous bone with the obtained cortical bone, for the reconstruction of 18 cm of bone defect.
[auto_translate_button]
Figura 27: Nas reconstruções segmentares, o enxerto deve ser colocado entrelaçado, para evitar linhas de possível pseudoartrose.
Figure 27: In segmental reconstructions, the graft must be placed interlaced, to avoid lines of possible pseudarthrosis.
Note in figures 28 and 29, x-ray and photo of the iliac bone, the evidence of the absence of a graft in the area indicated by the yellow arrows. On the radiograph, the rarefaction area and the transparency of this region are highlighted by transillumination.
Figura28: Anatomia do ilíaco, radiografia: A seta assinala a área sem enxerto.
Figure 28: Iliacus anatomy, x-ray: The arrow marks the area without a graft.
Figura 29: Osso ilíaco por trans iluminação, podemos constatar a ausência de enxerto nesta "ilha", apontada pela seta amarela.
Figure 29: Iliac bone by trans illumination, we can see the absence of graft in this "island", indicated by the yellow arrow.
When the patient needs to be positioned in the prone position, as in spinal surgeries, we can obtain an autologous graft more easily, exposing the iliac bone. In this approach, the best incision is horizontal, at the level of the posterior superior iliac spine. This incision is more cosmetic and can be easily hidden by a bikini, in addition to facilitating both the exposure of the iliac crest and the posterior column, figures 30 and 31.
Figura 30: Incisão horizontal, na altura da espinha póstero-superior, para exposição da tábua externa e retirada de enxerto do ilíaco posterior.
Figure 30: Horizontal incision, at the level of the posterosuperior spine, to expose the external table and remove the posterior iliac graft.
Figura 31: Assepsia e antissepsia para incisão horizontal, na altura da espinha póstero-superior, para exposição da tábua externa e retirada de enxerto do ilíaco posterior.
Figure 31: Asepsis and antisepsis for horizontal incision, at the level of the posterosuperior spine, to expose the external table and remove the posterior iliac graft.
We incise the skin and subcutaneous cellular tissue, perform careful hemostasis and remove the perimysium of the gluteus maximus muscle. We place Hohmann retractors supported on the iliac crest and reflect the subcutaneous tissue superiorly, Figure 32. The same detachment is performed distally and we support a Bennet retractor on the greater sciatic notch and remove the external cortex, Figure 33.
Figura 32: Rebatimento da pele e subcutâneo com afastadores de Hohmann, apoiados na crista ilíaca, superiormente. Exposição do músculo glúteo máximo.
Figure 32: Reflection of the skin and subcutaneous tissue with Hohmann retractors, supported on the iliac crest, superiorly. Exposure of the gluteus maximus muscle.
Figura 33: Cortical externa retirada e exposição para retirada do enxerto esponjoso. Seta amarela destacando a "ilha", que deve ser preservada. Seta azul assinala o afastador de Bennet, apoiado na incisura isquiática maior.
Figure 33: External cortex removed and exposed for removal of the cancellous graft. Yellow arrow highlighting the "island", which must be preserved. Blue arrow marks Bennet's retractor, supported on the greater sciatic notch.
We scrape the spongy bone with sharp chisels and remove the graft from the sacroiliac region, crest and posterior column. We perform hemostasis of the nutrient vessels with bone wax, figure 34. The graft obtained is chopped into thin sticks, to facilitate reabsorption and reintegration, figure 35.
Figura 34: Osso esponjoso já retirado, raspando com formões afiados. Hemostasia dos vasos nutrícios com cera para osso.
Figure 34: Spongy bone already removed, scraping with sharp chisels. Hemostasis of nutrient vessels with bone wax.
Figura 35: Enxerto ósseo picado em forma de finos palitos.
Figure 35: Bone graft chopped into thin sticks.

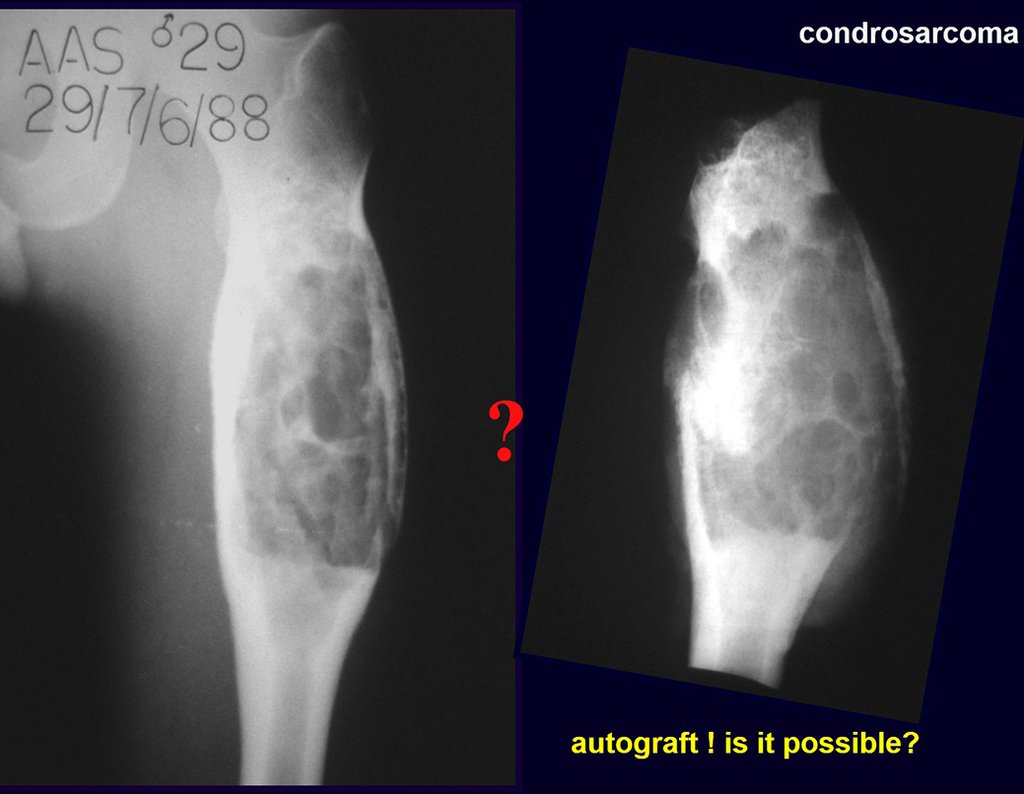
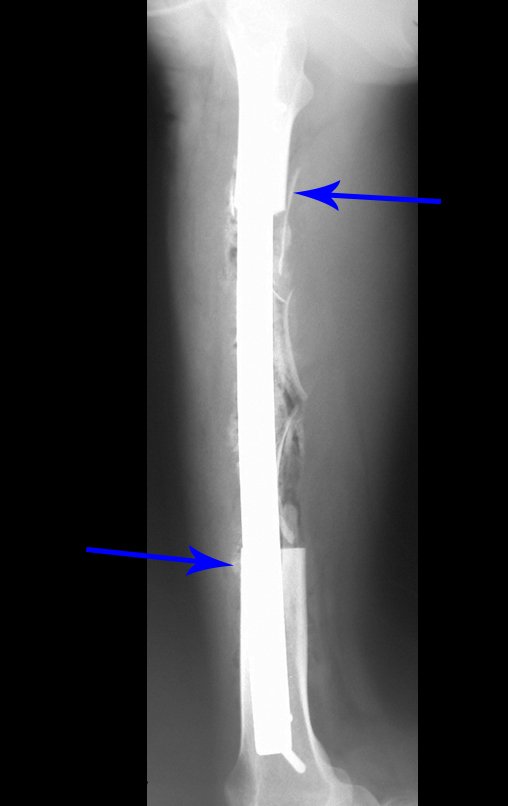
It is important to remember the concept of repairing bone defects with bone grafts: IN A BIOLOGICAL RECONSTRUCTION, EVERY BONE GRAFT  PLACED TO FILL CAVITIES OR SEGMENTAL FAULTS GOES THROUGH A  REABORTION PHASE  TO  BE LATER REINTEGRATED , REPAIRING THE BONE LOSS. The graft must be intertwined and go beyond the level of the osteotomy, avoiding pseudarthrosis, as exemplified by this case of chondrosarcoma in figures 36 to 38, blue arrows.

Figura 36: Enxerto ósseo picado e entrelaçado em paliçada, preenchendo a falha óssea segmentar.
Figure 36: Bone graft chopped and intertwined in a palisade, filling the segmental bone gap.
Figura 37: Radiografia, frente, reconstrução com enxerto ósseo autólogo e osteossíntese com placa especial.
Figure 37: Radiograph, front, reconstruction with autologous bone graft and osteosynthesis with a special plate.
Figura 38: Radiografia, perfil, reconstrução com enxerto ósseo autólogo e osteossíntese com placa especial.
Figure 38: Radiograph, profile, reconstruction with autologous bone graft and osteosynthesis with a special plate.
Below, we present an example of cavity reconstruction, in the case of a giant cell tumor, treated with intra-lesional curettage, adjuvant electrothermia, crimping with a dental ball and filling with an autologous bone graft, taken from the internal table of an iliac bone. Full integration of the graft and excellent function of the operated knee, figures 39 to 49.
Figura 39: Radiografia do joelho, frente, com grande lesão de rarefação óssea, comprometendo toda a região epífise metafisária do fêmur direito.
Figure 39: X-ray of the knee, front, with a large bone rarefaction lesion, affecting the entire metaphyseal epiphyseal region of the right femur.
Figura 40: Radiografia do joelho, perfil, grande lesão epífise metafisária do fêmur direito, com erosão da cortical anterior.
Figure 40: X-ray of the knee, profile, large metaphyseal epiphyseal lesion of the right femur, with erosion of the anterior cortex.
Figura 41: RM do joelho, grande lesão de rarefação óssea, comprometendo toda a região epífise metafisária do fêmur direito.
Figure 41: MRI of the knee, large bone rarefaction lesion, affecting the entire metaphyseal epiphyseal region of the right femur.
Figura 42: Incisão medial e ressecção do trajeto da biópsia.
Figure 42: Medial incision and resection of the biopsy path.
Figura 43: Retirada da cortical medial e abertura de ampla janela para curetagem intralesional. A cortical rebatida e campos suturados protegem o leito operatório.
Figure 43: Removal of the medial cortex and opening of a wide window for intralesional curettage. The reflected cortex and sutured fields protect the operating bed.
Figura 44: Adjuvância com eletrotermia.
Figure 44: Electrothermal adjuvant.
Figura 45: Preenchimento da cavidade com enxerto ósseo autólogo compactado e colocação de pedaço de osso córtico esponjoso para ocluir a "janela".
Figure 45: Filling the cavity with compacted autologous bone graft and placing a piece of cancellous cortical bone to occlude the "window".
Figura 46: Radiografia do joelho operado, frente, com enxerto totalmente integrado. Restauração integral da anatomia.
Figure 46: Radiograph of the operated knee, front, with fully integrated graft. Full restoration of anatomy.
Figura 47: Paciente no pós-operatório, membro alinhado, carga total.
Figure 47: Post-operative patient, limb aligned, full load.
Figura 48: Flexão de 145 graus do joelho operado.
Figure 48: 145 degree flexion of the operated knee.
Figura 49: Bom alinhamento com carga total no joelho operado.
Figure 49: Good alignment with full load on the operated knee.
The iliac bone is also a rich source of structural graft, with better quality in terms of integration than the fibula. Obtaining this type of graft deforms the anatomical contour of the pelvis, as there is a need to remove the iliac crest together with the internal and external cortex, forming a triangular block, as exemplified by the cases of simple bone cyst, shown in figures 50 to 60.
Figura 50: Cisto ósseo simples do fêmur, com fratura.
Figure 50: Simple bone cyst of the femur, with fracture.
Figura 51: Tomografia de fratura em cisto ósseo simples. A cortical do segmento proximal aparece afundada dentro da falha óssea na epífise.
Figure 51: Tomography of fracture in simple bone cyst. The cortex of the proximal segment appears sunken within the bone defect in the epiphysis.
Figura 52: Aspecto intraoperatório após a curetagem da lesão na diáfise, metáfise e epífise femoral. Segmento de enxerto estrutural retirado da crista ilíaca e reconstrução com placa angulada. A lâmina da placa é apoiada pelo enxerto, que mantem a distância entre a epífise e o segmento proximal.
Figure 52: Intraoperative appearance after curettage of the lesion in the femoral diaphysis, metaphysis and epiphysis. Structural graft segment removed from the iliac crest and reconstruction with an angled plate. The plate blade is supported by the graft, which maintains the distance between the epiphysis and the proximal segment.
Figura 53: Placa fixada, enxerto estrutural da crista ilíaca apoiando a lâmina e enxerto impactado preenchendo o restante da cavidade.
Figure 53: Plate fixed, structural graft from the iliac crest supporting the blade and impacted graft filling the rest of the cavity.
Figura 54: Radiografia de reconstrução de cisto ósseo com fratura. Observa-se o contorno do enxerto estruturado sendo integrado e a consolidação do enxerto fragmentado impactado.
Figure 54: Radiograph of bone cyst reconstruction with fracture. The contour of the structured graft being integrated and the consolidation of the impacted fragmented graft are observed.
Figura 55: Radiografia de reconstrução de cisto ósseo com fratura, bom alinhamento. Consolidação do enxerto fragmentado impactado.
Figure 55: Radiograph of bone cyst reconstruction with fracture, good alignment. Consolidation of the impacted fragmented graft.
Video 2: Aesthetic and functional aspect. Good reconstruction, anatomical, and good flexion function with full load.
Another example of the use of a structural graft can be seen in this case of reconstruction of the first metatarsal, due to injury caused by a giant cell tumor, figures 57 to 60.
Figura 57: Tumor de células gigantes do primeiro metatarsiano; radiografia com a lesão lítica; incisão e exposição do tumor e peça resseca.
Figure 57: Giant cell tumor of the first metatarsal; radiography with the lytic lesion; incision and exposure of the tumor and resection of the piece.
Figura 58: Reconstrução do primeiro metatarseano com enxerto ósseo autólogo estruturado, obtido da crista ilíaca.
Figure 58: Reconstruction of the first metatarsal with structured autologous bone graft, obtained from the iliac crest.
Figura 59: Radiografia da reconstrução; aspecto clínico pós operatório.
Figure 59: X-ray of the reconstruction; post-operative clinical appearance.
Figura 60: Aspecto estético e funcional da reconstrução.
Figure 60: Aesthetic and functional aspect of the reconstruction.
Figura 61: Sarcoma de Ewing do úmero, quimioterapia, cirurgia de ressecção e reconstrução biológica autóloga com fíbula e enxerto estrutural de crista ilíaca.
Figure 61: Ewing sarcoma of the humerus, chemotherapy, resection surgery and autologous biological reconstruction with fibula and iliac crest structural graft.
Figura 62: Paciente em pós-operatório de dois meses, ainda em quimioterapia e após 24 anos, grávida.
Figure 62: Patient two months post-operatively, still undergoing chemotherapy and after 24 years, pregnant.
Video 3: Good aesthetics and function, 22 years after surgery.

This case can be seen in full by accessing the link: http://bit.ly/sarcoma-de-Ewing

The fibula can also be used vascularized in reconstructions, including with the growth plate to replace the one that will be resected due to the tumor. It is a fibula autotransplantation with the physeal plate, performing osteosynthesis with the extensible internal fixation device, figures 63 and 64.

Figura 63: Sarcoma de Ewing do úmero, Quimioterapia + ressecção do tumor. Planejamento da reconstrução com dispositivo de fixação interna extensível.
Figure 63: Ewing sarcoma of the humerus, Chemotherapy + tumor resection. Reconstruction planning with an extensible internal fixation device.
Figura 64: Reconstrução com autotransplante de placa de crescimento da fíbula, com microcirurgia. Radiografia da osteossíntese com o dispositivo extensível.
Figure 64: Reconstruction with autotransplantation of the fibula growth plate, with microsurgery. Radiography of osteosynthesis with the extendable device.

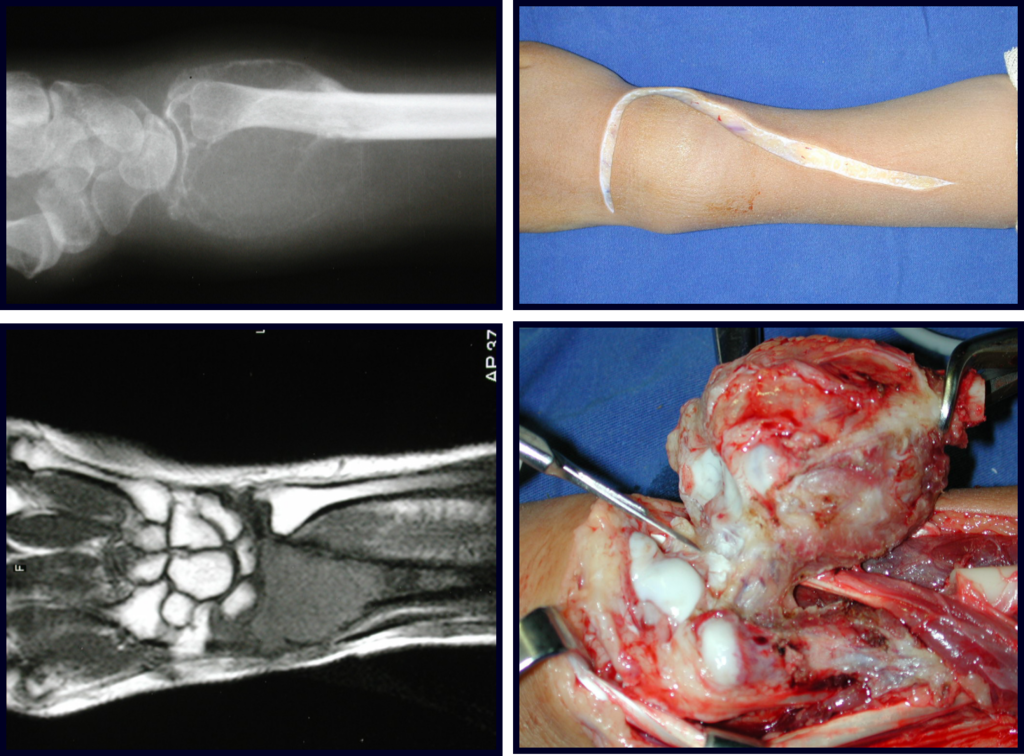
In the reconstruction of small segments, such as in reconstruction of the radius, due to trauma or tumors, we can use the free fibula with good results, figures 65 and 66.

This case can be seen in full by accessing the link: http://bit.ly/tgc_radio

Figura 65: Tumor de células gigantes do rádio. Ressecção da lesão.
Figure 65: Giant cell tumor of the radius. Resection of the lesion.
Figura 66: Peça ressecada. Obtenção de enxerto autólogo de fíbula. Reconstrução do punho.
Figure 66: Dried piece. Obtaining an autologous fibula graft. Wrist reconstruction.
Still undergoing reconstructions of the pelvis, figure 67
Figura 67: Reconstrução da pelve com enxerto autólogo de fíbula em Sarcoma de Ewing.
Figure 67: Reconstruction of the pelvis with autologous fibula graft in Ewing Sarcoma.
Figura 68: Reconstrução de fratura do colo femoral com enxerto autólogo estrutural de crista ilíaca.
Figure 68: Reconstruction of femoral neck fracture with autologous structural iliac crest graft.
Another source of graft is the femoral or tibial condyles, figures 69 and 70.
Figura 69: Artrodese do joelho, com emprego de enxerto ósseo autólogo estrutural do côndilo femoral.
Figure 69: Arthrodesis of the knee, using an autologous structural bone graft from the femoral condyle.
Figura 70: Artrodese do joelho com enxerto do planalto tibial e patela.
Figure 70: Knee arthrodesis with tibial plateau and patella graft.

Author: Prof. Dr. Pedro Péricles Ribeiro Baptista

 Orthopedic Oncosurgery at the Dr. Arnaldo Vieira de Carvalho Cancer Institute

Leave a Reply

Hello! How can we assist you?