This digital library houses the book on Oncology and Orthopedic Oncosurgery.

It includes academic lectures, presentations from national and international congresses, published papers, case discussions, performed surgical procedures, and proprietary techniques developed.

The digital format was chosen because the web allows the inclusion of texts with numerous visual resources, such as images and videos, which would not be possible in a printed book.

The content is intended for students, healthcare professionals, and the general public interested in the field.

Technique for Revision of Infected Hip Prosthesis

F23775b54b9e62e2d15498c3b9418630 3
Technique for Revision of Infected Hip Prosthesis. A 52-year-old patient, with bilateral osteoarthritis of the hips, due to aseptic necrosis of the femoral heads, with more severe pain and disability on the left, underwent total hip arthroplasty E, figures 1 and 2.

Technique for revision of infected hip prosthesis – Arthrosis due to femoral head necrosis – Loosening and breakage of prosthesis, infection and fracture.

Figura 1: Radiografia da bacia frente, com artrose bilateral dos quadris.
Figure 1: X-ray of the front pelvis, with bilateral osteoarthritis of the hips.
Figura 2: Radiografia da bacia frente, em junho de 1999, após artroplastia total do quadril esquerdo.
Figure 2: Radiograph of the front pelvis, in June 1999, after total arthroplasty of the left hip.
He later underwent surgery on the hip on the right side. During follow-up, the left femoral component became loose and, in February 2008, the stem broke. In May, the first revision was carried out, with a new prosthesis using a long neck and short stem, figures 3 and 4.
Figura 3: Soltura do componente femoral e quebra da haste à esquerda, fevereiro de 2008.
Figure 3: Loosening of the femoral component and breakage of the nail on the left, February 2008.
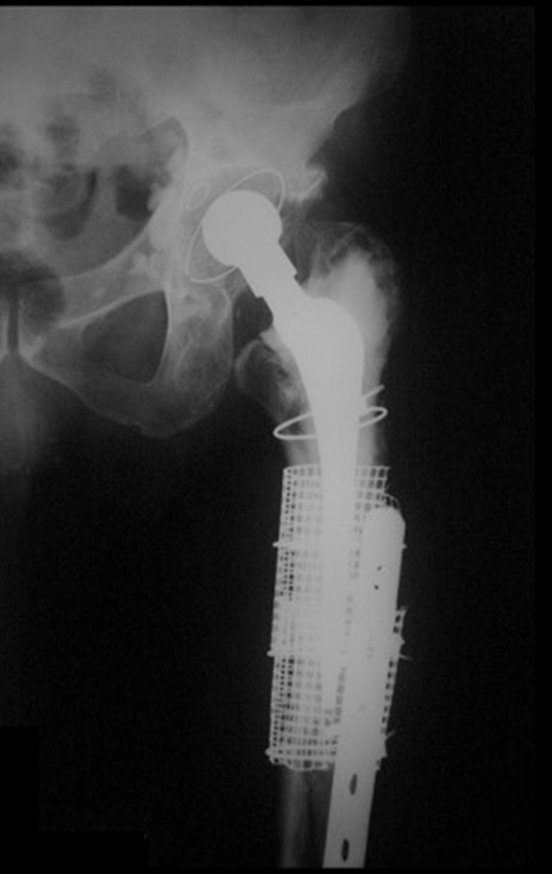
Figura 4: Revisão do quadril esquerdo com troca da prótese femoral, com colo longo, haste curta e placa com tela e cerclagem, em maio de 2008.
Figure 4: Revision of the left hip with replacement of the femoral prosthesis, with long neck, short stem and plate with mesh and cerclage, in May 2008.
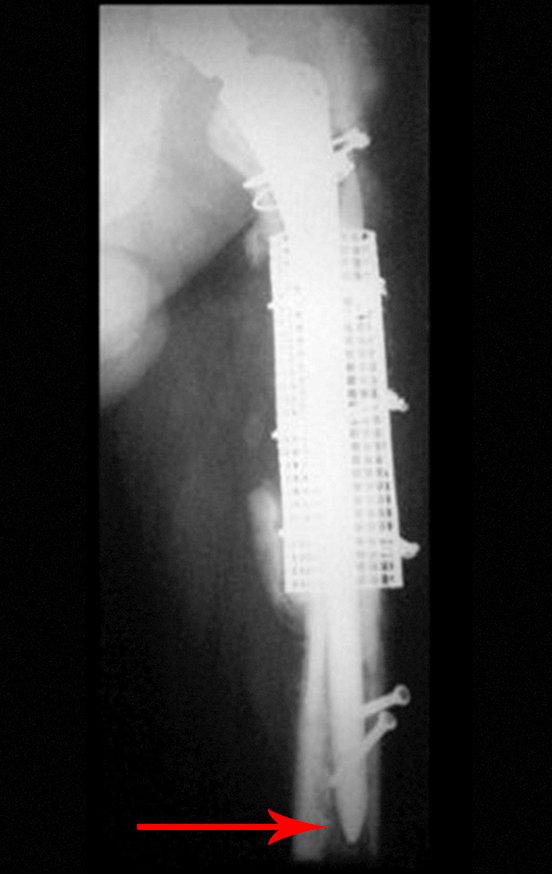
Figura 5: Fratura do fêmur no final da haste femoral curta, em setembro de 2008, apenas quatro meses após a segunda cirurgia, do lado esquerdo.
Figure 5: Femur fracture at the end of the short femoral stem, in September 2008, just four months after the second surgery, on the left side.
Figura 6: Osteossíntese da fratura periprotética com placa e enxerto ósseo, terceira cirurgia.
Figure 6: Osteosynthesis of the periprosthetic fracture with plate and bone graft, third surgery.
Figura 7: Soltura da placa, em maio de 2009, após oito meses da terceira cirurgia.
Figure 7: Plate release, in May 2009, eight months after the third surgery.
Figura 8: Nova revisão, com troca da prótese femoral, agora com haste longa, em junho de 2009, quarta cirurgia.
Figure 8: New revision, with exchange of the femoral prosthesis, now with a long stem, in June 2009, fourth surgery.
In February 2010, the long femoral stem was loosened, followed by a new revision with a plate, mesh, homologous graft and reinforced plate. Infection with active fistula and new releases, now with the patient presenting diabetes, figures 9 to 12.
Figura 9: Soltura da haste femoral longa, em fevereiro de 2010.
Figure 9: Loosening of the long femoral stem, in February 2010.
Figura 10: Nova cimentação da haste femoral longa, acrescida de enxerto homólogo, com troca da tela e nova placa reforçada, junho de 2010.
Figure 10: New cementation of the long femoral stem, added with a homologous graft, with replacement of the mesh and new reinforced plate, June 2010.
Figura 11: Reabsorção parcial do enxerto e infecção, março de 2011.
Figure 11: Partial graft resorption and infection, March 2011.
Figura 12: Calo reativo, pela movimentação do conjunto. Soltura da placa e infecção, com fístula produtiva. Realizada nova limpeza cirúrgica, outubro de 2013.
Figure 12: Reactive callus, due to movement of the assembly. Plaque loosening and infection, with productive fistula. New surgical cleaning was performed, October 2013.
From 2010 to 2014, the patient underwent surgical cleaning and systemic antibiotic therapy, under the supervision of an infectious disease specialist, in successive hospitalizations, aiming to achieve control of the infection for a two-stage revision. In March 2014, we evaluated the patient and analyzed the case. We recommend a single-stage revision, resecting the proximal segment en bloc, with prosthesis, plate, screws, mesh, wires, grafts, sequestrations and necrotic tissue, as if it were a neoplasm, and replacing it with a non-conventional polyethylene endoprosthesis. This endoprosthesis is nothing more than a spacer, with the advantage of immediately filling the dead space and providing immediate function of the operated limb, figures 13 to 15.
Figura 13: Infecção, soltura da placa, fístula ativa em paciente agora diabético, após quatro limpezas cirúrgicas e antibioticoterapia sistêmica nos últimos quatro anos.
Figure 13: Infection, plaque loosening, active fistula in a now diabetic patient, after four surgical cleanings and systemic antibiotic therapy in the last four years.
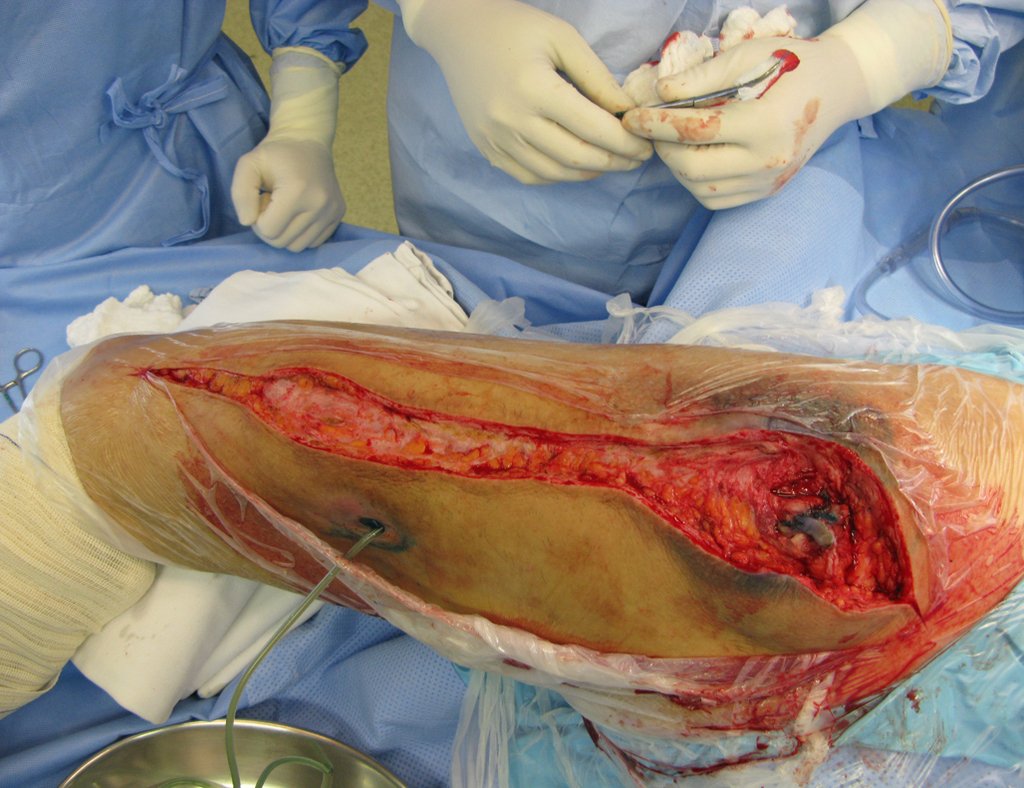
Figura 14: Aspecto clínico em março de 2014, pré-operatório. Antibioticoterapia pré-operatória, diabete compensada, apesar de fístula ativa.
Figure 14: Clinical appearance in March 2014, pre-operative. Preoperative antibiotic therapy, diabetes compensated, despite active fistula.
Figura 15: Prótese modular de polietileno e titânio.
Figure 15: Modular polyethylene and titanium prosthesis.
Pre-operative radiographs of the revision in a surgical procedure, in April 2014, figures 19 to 128.
Figura 16: Radiografia pré-operatória da revisão em um tempo de artroplastia infectada do quadril esquerdo.
Figure 16: Preoperative radiograph of the revision in an infected arthroplasty of the left hip.
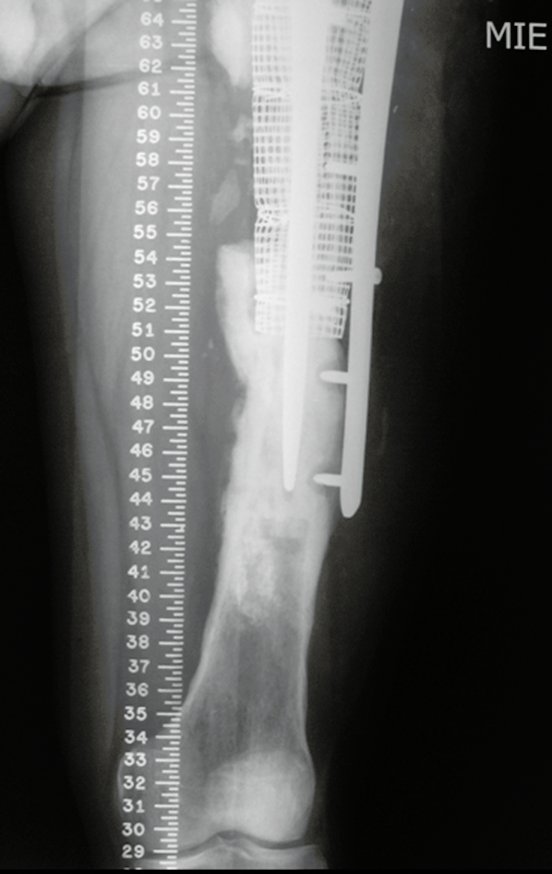
Figura 17: Radiografia do quadril esquerdo frente, com régua, evidenciando a má qualidade do osso e a soltura da prótese e da osteossíntese.
Figure 17: Radiograph of the front left hip, with a ruler, showing the poor quality of the bone and the loosening of the prosthesis and osteosynthesis.
Figura 18: Radiografia com detalhe da soltura no segmento distal, pré-operatório de revisão em um tempo.
Figure 18: Radiograph with detail of the loosening in the distal segment, pre-operative revision at a time.
Revision surgery, April 8, 2014, figures 19 to 15.
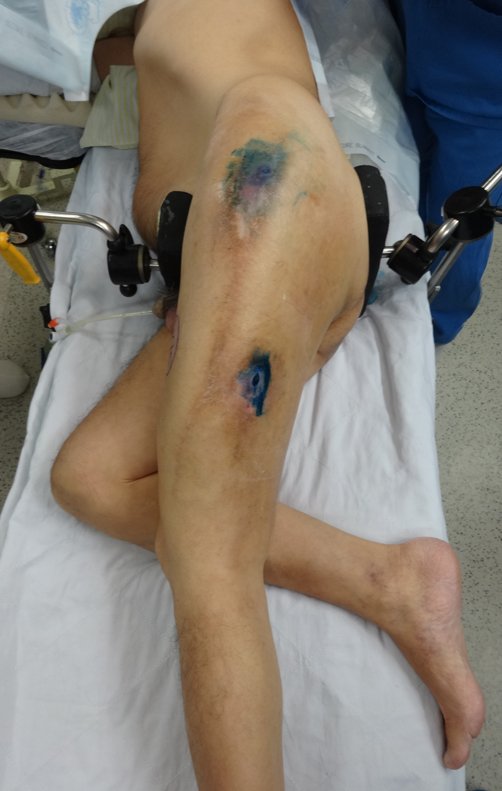
Figura 19: Paciente em decúbito lateral, fixado com posicionador, destacando-se o azul de metileno injetado pelas duas fístulas, cujos trajetos serão ressecados em bloco com todos os tecidos desvitalizados, juntamente com a prótese, enxertos necróticos e materiais de osteossínteses soltos, que foram empregados nas cirurgias anteriores.
Figure 19: Patient in lateral decubitus, fixed with a positioner, highlighting the methylene blue injected through the two fistulas, whose paths will be resected en bloc with all devitalized tissues, together with the prosthesis, necrotic grafts and loose osteosynthesis materials, which were used in previous surgeries.
Figura 20: Assepsia e antissepsia. Figura 21: Passagem de sonda pela fístula inferior, drenagem de secreção e lavagem da ¨cavidade¨. Incisão na coxa.
Figure 20: Asepsis and antisepsis. Figure 21: Passing a probe through the inferior fistula, draining secretion and washing the ¨cavity¨. Incision in the thigh.
Figura 22: Podemos evidenciar a placa, parafusos, cerclagem com amarrilho no fêmur esquerdo.
Figure 22: We can see the plate, screws, cerclage with ligature on the left femur.
Figura 23: Dissecção do segmento de 2/3 proximais do fêmur a ser ressecado.
Figure 23: Dissection of the proximal 2/3 segment of the femur to be resected.
Figura 24: Dissecção anterior e posterior do segmento a ser ressecado em bloco.
Figure 24: Anterior and posterior dissection of the segment to be resected en bloc.
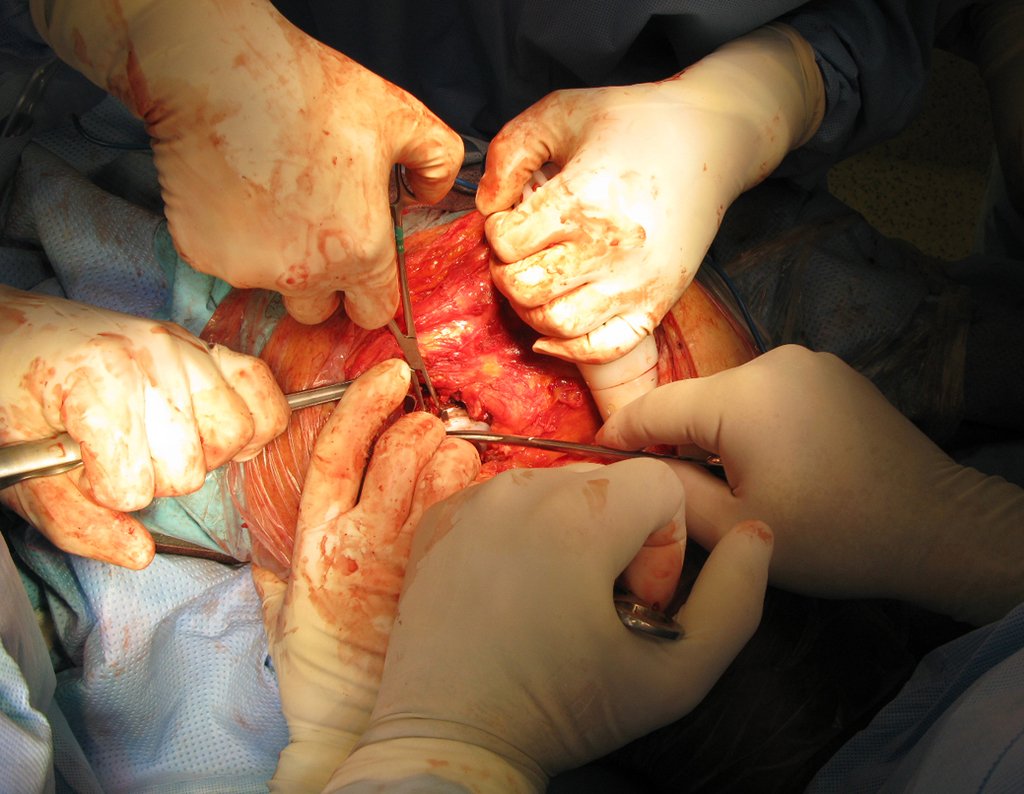
Figura 25: Liberação de fibras do vasto medial aderidas à fibrose da pseudo cápsula ao redor do complexo processo infeccioso (prótese, placa, tela e amarrilhos soltos e sequestros ósseos).
Figure 25: Release of vastus medialis fibers adhered to the pseudocapsule fibrosis around the complex infectious process (prosthesis, plate, mesh and loose ties and bone sequestrations).
Figura 26: Luxação do segmento e liberação posterior. Observem os inúmeros componentes inoperantes nesta montagem.
Figure 26: Segment dislocation and posterior release. Note the numerous inoperative components in this assembly.
Figura 27: Ressecção de fibrose póstero inferior e preparação do nível de osteotomia femoral.
Figure 27: Resection of posteroinferior fibrosis and preparation of the femoral osteotomy level.
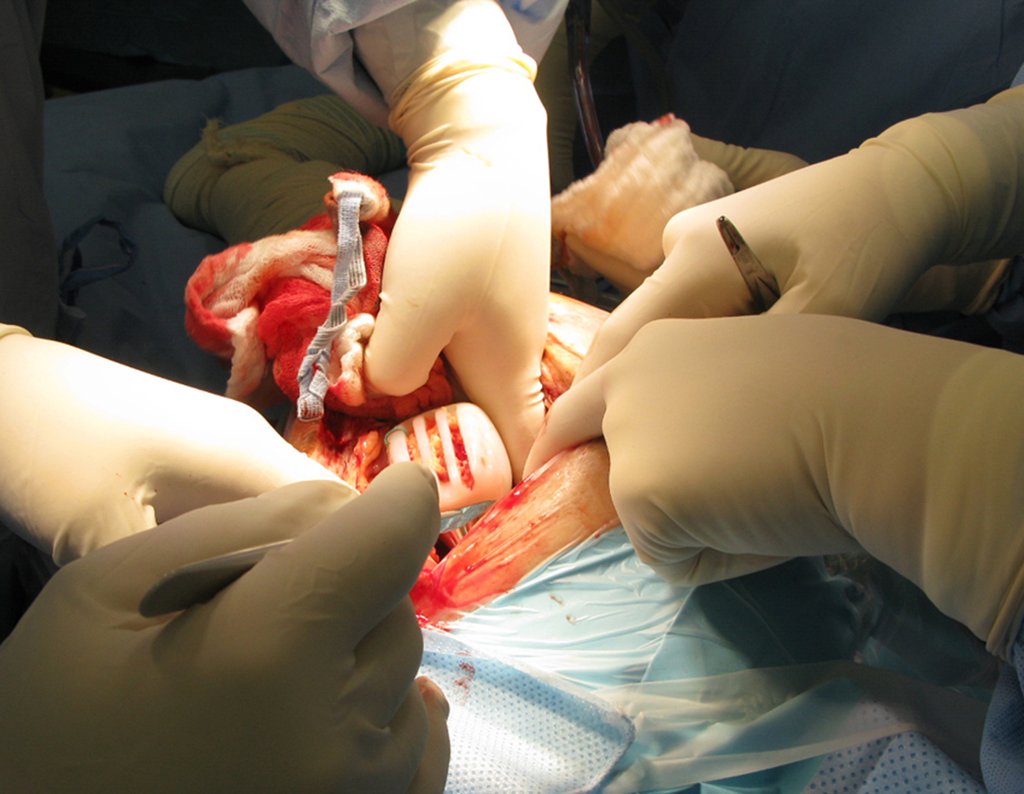
Figura 28: Ao dissecarmos a região medial distal, encontramos uma outra loja, extraóssea, com abcesso purulento.
Figure 28: When dissecting the distal medial region, we found another store, extraosseous, with a purulent abscess.
Figura 29: Em detalhe, abcesso envolto por tecido fibroso cicatricial, sem continuidade com a montagem, que necessita ser ressecado em bloco também.
Figure 29: In detail, abscess surrounded by fibrous scar tissue, without continuity with the assembly, which also needs to be resected en bloc.
Figura 30: Osteotomia com serra de Giglê.
Figure 30: Osteotomy with a Gigle saw.
Figura 31: Liberação de aderências na linha áspera e desinserção muscular.
Figure 31: Release of adhesions in the linea aspera and muscle disinsertion.
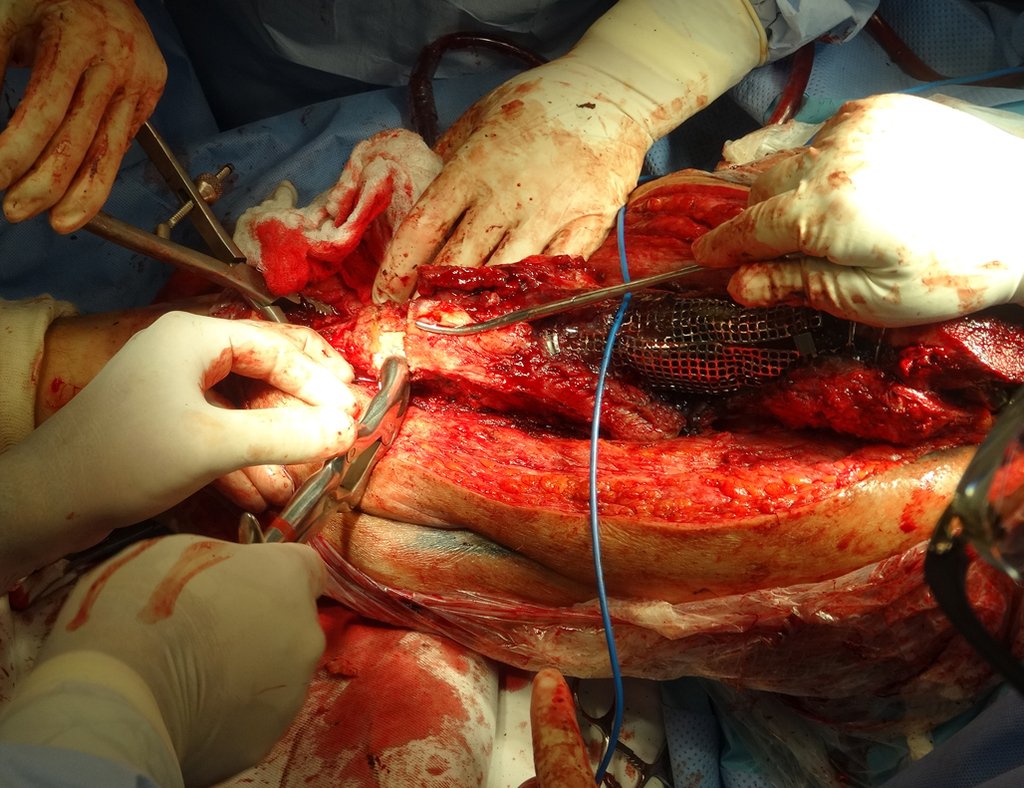
Figura 32: Ressecção de 2/3 proximais do fêmur, em bloco (fibrose, amarrilho, tela, placa, prótese, cimento e enxerto ósseo sequestrado).
Figure 32: Resection of the proximal 2/3 of the femur, en bloc (fibrosis, ligature, mesh, plate, prosthesis, cement and sequestered bone graft).
Figura 33: Visualização posterior do segmento ressecado em bloco.
Figure 33: Posterior view of the en bloc resected segment.
Figura 34: Desmontagem do amarrilho e abertura da tela. Observem os sequestros resultantes do enxerto homólogo.
Figure 34: Dismantling the tie and opening the screen. Observe the sequestrations resulting from the homologous graft.
Figura 35: Os sequestros estão até esverdeados, devido à intensa proliferação bacteriana, apesar de quatro anos de antibioticoterapia.
Figure 35: The sequestrations are even greenish, due to intense bacterial proliferation, despite four years of antibiotic therapy.
Figura 36: Leito ressecado e curetagem dos tecidos moles, para retirada do excesso de tecido desvitalizado.
Figure 36: Resected bed and soft tissue curettage, to remove excess devitalized tissue.
Figura 37: Canal femoral curetado e fresado, pronto para a reconstrução com endoprótese modular de polietileno.
Figure 37: Curetted and milled femoral canal, ready for reconstruction with modular polyethylene endoprosthesis.
Figura 38: Área preparada para a colocação da endoprótese modular. Optamos por manter o componente acetabular.
Figure 38: Area prepared for the placement of the modular stent. We chose to maintain the acetabular component.
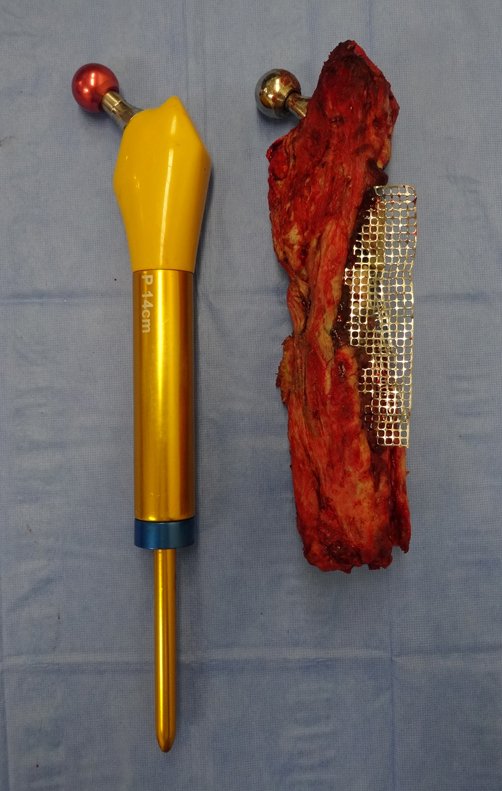
Figura 39: Montagem da prótese de prova, comparação com o segmento removido.
Figure 39: Assembly of the trial prosthesis, comparison with the removed segment.
Figura 40: Colocação e teste com a prótese de prova.
Figure 40: Placement and testing with the trial prosthesis.
Figura 41: Montagem da prótese modular a ser implantada, conforme a dimensão da prótese de prova.
Figure 41: Assembly of the modular prosthesis to be implanted, according to the size of the trial prosthesis.
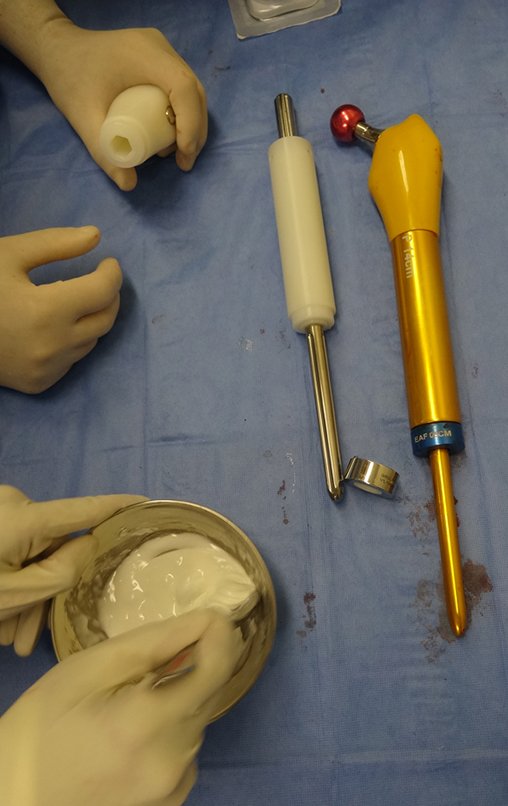
After testing with the trial prosthesis and choosing the definitive modules, we proceed to cementing the endoprosthesis components, figures 42 to 53.
Figura 42: Preparo do cimento na cuba.
Figure 42: Preparation of cement in the vat.
Figura 43: Cimento pronto, colocação de pouca quantidade dentro do canal sextavado do componente proximal da prótese.
Figure 43: Ready cement, placing a small amount inside the hexagonal canal of the proximal component of the prosthesis.
Figura 44: Encaixa-se o componente proximal com o prolongador diafisário dimensionado, cimentando-se e fixando os módulos, para evitar eventual pistonagem.
Figure 44: Fit the proximal component with the sized diaphyseal extender, cementing and fixing the modules, to avoid possible pistoning.
Figura 45: Com o polegar tamponamos o orifício de respiro para saída do excesso de cimento e comprimimos os componentes.
Figure 45: Using our thumb, we plug the breather hole to allow excess cement to escape and compress the components.
Figura 46: Diminuímos o tamponamento, permitindo a saída do excesso de cimento, permitindo a exata compactação dos módulos.
Figure 46: We reduced the plugging, allowing excess cement to escape, allowing the exact compaction of the modules.
Figura 47: Colocamos também um pouco de cimento ao redor do encaixe do anel metálico de acabamento.
Figure 47: We also placed a little cement around the fitting of the metal finishing ring.
Figura 48: Cimentação do espessor de acabamento. (variam de 0, 0.5, 1.0 e 1.5 de espessamento, para ajustes do comprimento, quando necessário).
Figure 48: Cementation of the finishing thickener. (they vary from 0, 0.5, 1.0 and 1.5 thickening, for length adjustments, when necessary).
Figura 49: Limpeza e retirado do excesso de cimento da parte proximal da endoprótese.
Figure 49: Cleaning and removing excess cement from the proximal part of the endoprosthesis.
Figura 50: Retirada do excesso de cimento. Endoprótese modular montada no intraoperatório pronta, para ser empregada na reconstrução.
Figure 50: Removal of excess cement. Modular endoprosthesis assembled intraoperatively ready to be used in reconstruction.
Figura 51: Colocação de cimento no canal femoral.
Figure 51: Placement of cement in the femoral canal.
Figura 52: Introdução da prótese definitiva no segmento distal da diáfise do fêmur.
Figure 52: Introduction of the definitive prosthesis in the distal segment of the femoral shaft.
Figura 53: Cimentação da endoprótese, com atenção a fixar com 10 graus de rotação em anteversão.
Figure 53: Cementation of the endoprosthesis, paying attention to fixing it with 10 degrees of rotation in anteversion.
Figura 54: Endoprótese cimentada, manter compressão até a completa polimerização do cimento.
Figure 54: Cemented endoprosthesis, maintain compression until the cement is completely polymerized.
Figura 55: Conferência do posicionamento, reparo do tendão dos psoas e colocação da cabeça escolhida no colo da prótese.
Figure 55: Positioning check, repair of the psoas tendon and placement of the chosen head on the neck of the prosthesis.
Figura 56: Prótese reduzida.
Figure 56: Reduced prosthesis.
Figura 57: Inserção do tendão do médio glúteo nos orifícios da prótese.
Figure 57: Insertion of the gluteus medius tendon into the prosthesis holes.
Figura 58: Médio glúteo reinserido e dreno colocado.
Figure 58: Gluteus medius reinserted and drain placed.
Figura 59: Fechamento da ferida operatória.
Figure 59: Closing the surgical wound.
Figura 60: Radiografia pós-operatória de 14/05/2014.
Figure 60: Postoperative radiograph of 05/14/2014.
Figura 61: Radiografia da bacia de 14/05/2014, após um mês da ressecção em bloco e reconstrução com endoprótese não convencional modular de polietileno e titânio.
Figure 61: X-ray of the pelvis on 05/14/2014, one month after en bloc resection and reconstruction with an unconventional modular polyethylene and titanium endoprosthesis.
Around any endoprosthesis, fibrosis forms as a result of a foreign body reaction, resulting in a thick pseudo capsule, forming a case, which practically isolates this endoprosthesis from the body. The muscles and tendons, which were initially inserted into the prosthesis with ethibond threads, end up definitively adhering to this pseudo capsule. This pseudo capsule has a lining of fluid-secreting synovial epithelium, which ends up covering the endoprosthesis. This reactional fibrosis of the pseudocapsule can reach 5 mm in thickness. In revisions and even in surgeries with major muscle detachment, an increase in dead space may occur, resulting in the formation of excess synovial fluid, which increases the ¨case¨ that surrounds the prosthesis. This increase in volume, associated with weakness of the abductor muscles, can facilitate hip dislocation. On May 15, 2014, one month after surgery, the patient returned with an increase in thigh volume, no fever, no local heat, and signs of excess liquid content around the prosthesis. This liquid, when in excess, must be drained. Sometimes more than one procedure is necessary. It must be done with complete asepsis, using a large-caliber needle and emptying the contents as much as possible, figures 62 to 64.
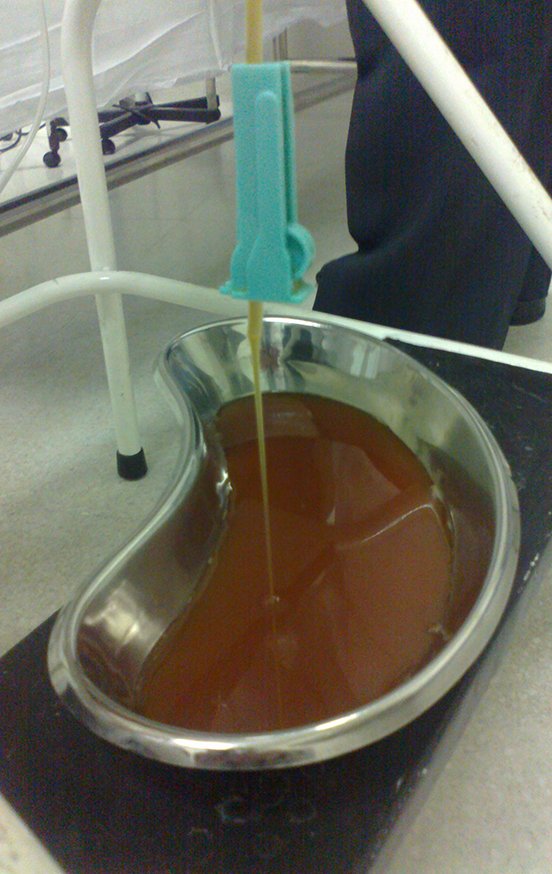
Figura 62: Drenagem com equipos de soro e punção utilizando duas agulhas grossas, anestesia local se necessário.
Figure 62: Drainage with serum and puncture equipment using two thick needles, local anesthesia if necessary.
Figura 63: Observe a grande quantidade de líquido que pode se formar em casos de grandes descolamentos. Este líquido deve ser colhido para cultura e antibiograma, para o caso de haver recorrência da infecção. Neste caso não apresentou mais infecção.
Figure 63: Note the large amount of liquid that can form in cases of large detachments. This liquid must be collected for culture and antibiogram, in case the infection recurs. In this case, there was no further infection.
Figura 64: Na drenagem, quando diminui a drenagem espontânea, devemos colocar o paciente em pé e realizar compressão na coxa, ordenhando para o melhor esvaziamento.
Figure 64: During drainage, when spontaneous drainage decreases, we must place the patient in a standing position and apply compression to the thigh, milking for better emptying.
A new drainage was performed by puncture, on 05/28/2015, after two weeks. The patient was already able to walk with a walker and had no recurrence of the infection, figures 65 to 67.
Figura 65: Pós-operatório de dois meses.
Figure 65: Two months post-operative.
Figura 66: Carga total monopodal, após dois meses.
Figure 66: Total single-leg load, after two months.
Figura 67: Deambulando com andador, após dois meses da revisão em um só tempo com endoprótese não convencional.
Figure 67: Walking with a walker, two months after the one-time revision with a non-conventional endoprosthesis.
Video 1: Patient walking with a walker two months after the review.
In June 2014, he performed a hyperflexion and internal rotation movement, while sitting on a low toilet, presenting hip dislocation. A closed reduction was performed and we reoriented again regarding the movements that facilitated the dislocation, as there was significant hypotrophy of the gluteus medius, which made stabilization of the prosthesis even more difficult. A new episode of dislocation in July 2014, three months after surgery. We performed reduction maneuvers under radioscopy, without the need for sedation and obtained easy reduction and also easy displacement, confirming the inability to contain the reduced hip, due to the insufficiency of the abductor muscles and the femoral head that we used, which was small in size, figures 65 to 67 .
Figura 68: Radiografia do quadril luxado, em julho de 2014, após três meses da revisão.
Figure 68: Radiograph of the dislocated hip, in July 2014, three months after the review.
Figura 69: Prótese luxada: falta de troca do acetábulo, seta amarela; cabeça femoral pequena, seta laranja e insuficiência do médio glúteo, seta vermelha.
Figure 69: Dislocated prosthesis: lack of replacement of the acetabulum, yellow arrow; small femoral head, orange arrow and gluteus medius insufficiency, red arrow.
Figura 70: Quadril luxado, aspecto da cicatriz antes da revisão do componente acetabular, em 27/07/2014.
Figure 70: Dislocated hip, appearance of the scar before revision of the acetabular component, on 07/27/2014.
We had not changed the acetabulum in the previous surgery, maintaining a smaller head than the size of the previous acetabulum, which could also be contributing to the instability. We decided on re-intervention with replacement of the acetabulum for a constricted module, also employing a larger head.
Figura 71: Revisão da reconstrução. Abertura proximal para a troca do acetábulo, utilizando componente constrito.
Figure 71: Reconstruction review. Proximal opening for replacing the acetabulum, using a constricted component.
Figura 72: Abertura da cápsula articular e exposição do acetábulo.
Figure 72: Opening of the joint capsule and exposure of the acetabulum.
Figura 73: Retirada do polietileno acetabular.
Figure 73: Removal of the acetabular polyethylene.
Figura 74: Componente metálico do teto acetabular exposto, após a retirada do polietileno.
Figure 74: Metallic component of the acetabular roof exposed, after removing the polyethylene.
Figura 75: Colocação do novo acetábulo, detalhe dos orifícios para a fixação com parafusos.
Figure 75: Placement of the new acetabulum, detail of the holes for fixation with screws.
Figura 76: Novo componente acetabular, agora constrito.
Figure 76: New acetabular component, now constricted.
Figura 77: Colocação do novo polietileno.
Figure 77: Installing the new polyethylene.
Figura 78: Redução da prótese com acetábulo bloqueado e cabeça maior, com dificuldade.
Figure 78: Reduction of the prosthesis with blocked acetabulum and larger head, with difficulty.
Figura 79: Prótese reduzida, com cabeça femoral maior e acetábulo constrito.
Figure 79: Reduced prosthesis, with larger femoral head and constricted acetabulum.
Figura 80: Reinserção do médio glúteo na região trocanteriana da endoprótese.
Figure 80: Reinsertion of the gluteus medius into the trochanteric region of the endoprosthesis.
Figura 81: Radiografia do pós-operatório imediato da revisão com acetábulo bloqueado.
Figure 81: Immediate post-operative radiograph of revision with blocked acetabulum.
Figura 82: Sutura do tensor da fáscia lata e fechamento da ferida operatória.
Figure 82: Suturing the tensor fasciae latae and closing the surgical wound.
The patient evolved well, without complications, and was evaluated after one year, figures 83 to 86.
Figura 83: Paciente evoluindo bem, sem novo episódio de luxação, sem infecção, em 27/07/2015, após um ano.
Figure 83: Patient progressing well, without a new episode of dislocation, without infection, on 07/27/2015, after one year.
Figura 84: Bom alinhamento e equalização dos membros, em 27/07/2015, após um ano.
Figure 84: Good alignment and equalization of members, on 07/27/2015, after one year.
Figura 85: Flexão com carga satisfatória, em 27/07/2015, após um ano.
Figure 85: Flexion with satisfactory load, on 07/27/2015, after one year.
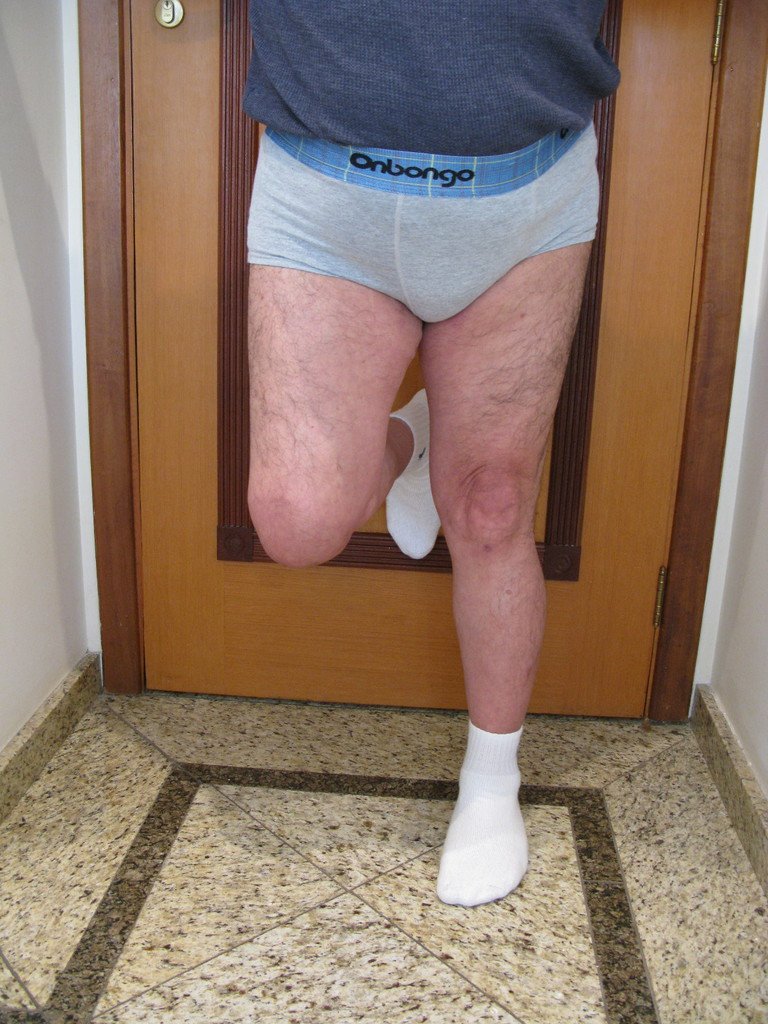
Figura 86: Carga total monopodal, em 27/07/2015, após um ano.
Figure 86: Total single-leg load, on 07/27/2015, after one year.
Video 2: Patient walking with trendelenburg, one year after the last surgery, acetabulum blocked, to overcome gluteus medius insufficiency.
Video 3: Patient walking without support, despite trendelemburg, after one year, on 07/27/2015.
To date, April 2, 2017, the patient is doing well, walking with a slight limp due to Trendelemburg, without any complications, three years after the last surgery.

Author: Prof. Dr. Pedro Péricles Ribeiro Baptista

 Orthopedic Oncosurgery at the Dr. Arnaldo Vieira de Carvalho Cancer Institute

Leave a Reply

Hello! How can we assist you?